
If using a Windows computer:
1.Put the CircuitPython operating system onto the microcontroller.
The microcontroller is an Adafruit Industries Feather STM32F405. We’re following the instructions on this webpage: https://learn.adafruit.com/adafruit-stm32f405-feather-express/dfu-bootloader-details
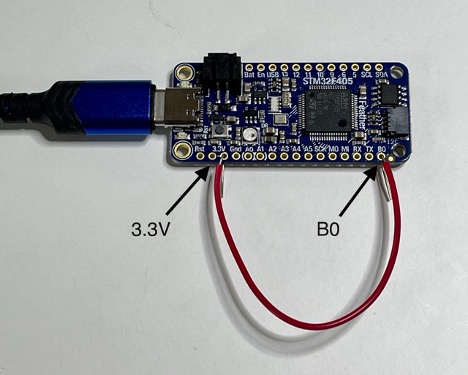
With the microcontroller disconnected from the computer, use a piece of wire to temporarily connect the B0 via to the 3.3V via. When plugged in, the microcontroller powers up into bootloader mode.
2.Once it’s powered up, check that the bootloader appears in the device listing:
Open the Control Panel, Hardware and Sound, Devices and Printers, and STM32 BOOTLOADER should show up in the Unspecified devices list.
3.Get the STM32CubeProgrammer from ST.com
https://www.st.com/en/development-tools/stm32cubeprog.html
4.Click “Get Software”, and choose the operating system version you have, most likely for Win64. Click “Get Latest”
5.At this point you have to register for an ST account. No way around that.
Submit your registration, and check your email to confirm. In your email, make very sure it’s from ST.com, and click “Download Now”.
The download will be a 218MB .zip file. Open it and click “Extract All”.
You’ll need administrator privileges to install the software.
The guide for operating the STMCubeProgrammer is here:
https://learn.adafruit.com/adafruit-stm32f405-feather-express/dfu-bootloader-details#step-3045684
6. Following the STMCubeProgrammer instructions, remove the wire between B0 and 3.3V, and unplug the microcontroller. Plug it back in, and you should see a CIRCUITPY drive on the hierarchy on the left in Windows.
7. Go to the webpage codewith.mu and download the Mu Editor.
8. Install and run the Mu Editor
9. Click on the Serial button in Mu, to look at the output of the STELLA instrument. If you click in the serial dialogue panel, ctrl-c will cancel the program, stopping it from running, and ctrl-d will decancel, restarting the program. You’ll see error messages in this panel that we will need for debugging.
10. If it’s all working correctly, that’s super! The clock still needs to be set, just once for as long as the clock battery lasts. It should be set to UTC, universal coordinated time, which you can get here: https://time.is/UTC
In the repository, in the folder titled test_codes, there is a folder titled real_time_clock. From that folder, copy code.py to the CIRCUITPY drive. It will run the real time clock read and set program. In the Mu editor, click the Load button to load the program.
The first if False: statement contains a place to set the clock. Set it to True, change the date, time, and day in the t = time.struct…. line, and then run the program to set the clock. Change it back to False, and re-run the program to confirm the time is set properly.
11. Then copy the instrument code to the instrument again, exactly as you did in Step 5.
At this point, it will either be working, or there will be some trouble in the wiring or the components. Look around in test_codes.
If using an Apple computer:
1.Put the CircuitPython operating system onto the microcontroller.
The microcontroller is an Adafruit Industries Feather STM32F405. We’re following the instructions on this webpage: https://learn.adafruit.com/adafruit-stm32f405-feather-express/dfu-bootloader-details
With the microcontroller disconnected from the computer, use a piece of wire to temporarily connect the B0 via to the 3.3V via. When plugged in, the microcontroller powers up into bootloader mode.
2.Click on the Apple icon on the upper left of the screen.
Choose: About this Mac
Choose: System Report
Confirm that the STM32 BOOTLOADER shows in the USB device tree.

3.Check that you have HomeBrew installed. If not, install it:
Applications, Utilities, Terminal
% brew -v
if you have brew, the response will be something similar to this:
Homebrew 3.6.14
Homebrew/homebrew-core (git revision a4894735611; last commit 2022-12-11)
if you don’t, the response will be that no brew is found.
To install Homebrew, we will use the command:
install.sh)”
which we find a the Homebrew source webpage: https://brew.sh
The system will ask for your password, since you need Super User access to install Brew.
(“sudo”)
==> This script will install:
/opt/homebrew/bin/brew
/opt/homebrew/share/doc/homebrew
/opt/homebrew/share/man/man1/brew.1
/opt/homebrew/share/zsh/site-functions/_brew
/opt/homebrew/etc/bash_completion.d/brew
/opt/homebrew
Press enter to accept this installation.
4.Get the CircuitPython file from this webpage: https://circuitpython.org/board/feather_stm32f405_express/
Download the latest BIN file.
Move that file from Downloads into the directory you are running terminal in.
Run this command in terminal, replacing the “firmware.bin” with the full filename of the CircuitPython file you just downloaded.
% dfu-util -a 0 −−dfuse-address 0x08000000 -D firmware.bin
In my case, the command looks like this.
% dfu-util -a 0 −−dfuse-address 0x08000000 -D adafruit-circuitpythonfeather_stm32f405_express-en_US-8.0.0-beta.6.bin
You’ll see this:
Downloading element to address = 0x08000000, size = 550496
Erase [=========================] 100% 550496 bytes
Erase done.
Download [=========================] 100% 550496 bytes
Download done.
File downloaded successfully
* if dfu-util is not found after installing Home-brew type
% brew install dfu-util
6. remove the wire from between B0 and 3.3V, and unplug the microcontroller from the computer, and then plug it in again.
The microcontroller will flash a yellow light, and the CIRCUITPY drive for this device will appear in your Finder tree, under Locations. If you don’t see it, click on the flippy triangle for Locations, to expand that list, and CIRCUITPY should show up.
