


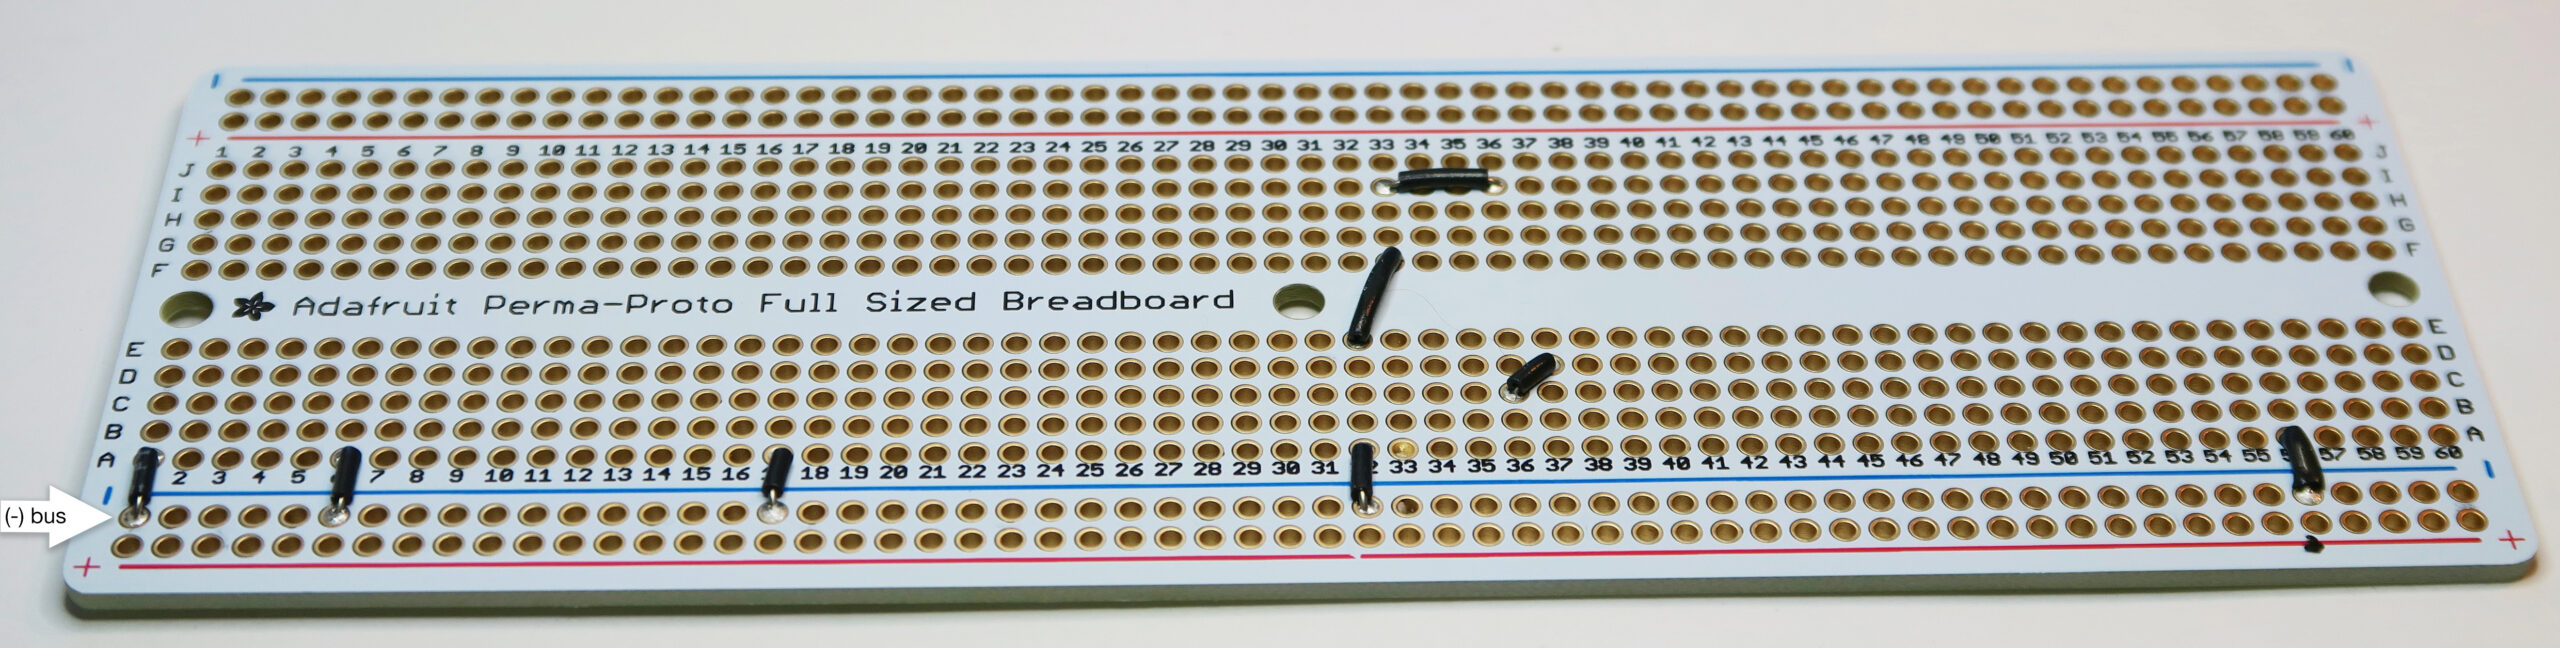
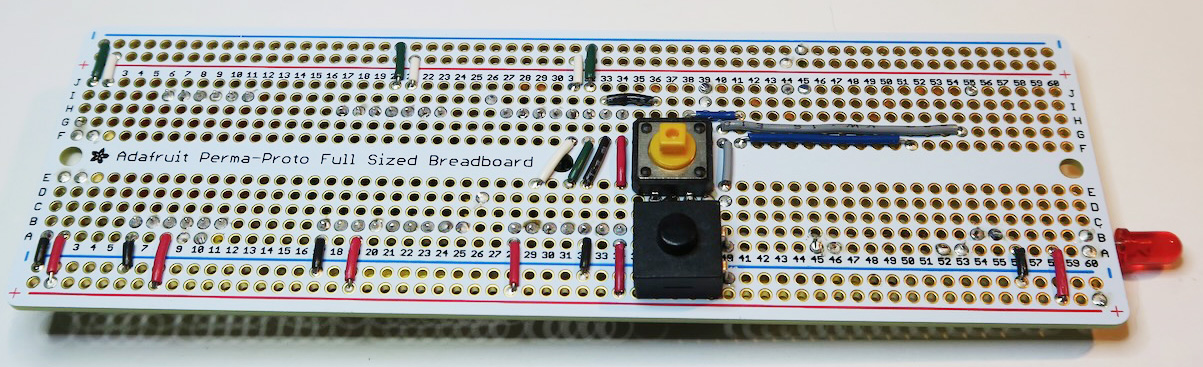
Step 1: Ground (black wire):
Front: Connect each to (-) bus below A row.
☐ A1
☐ A6
☐ A17
☐ A32
☐ A56
Front: Connect point to point.
☐ E32 - F33
☐ C36 - D37
☐ I33 - I36
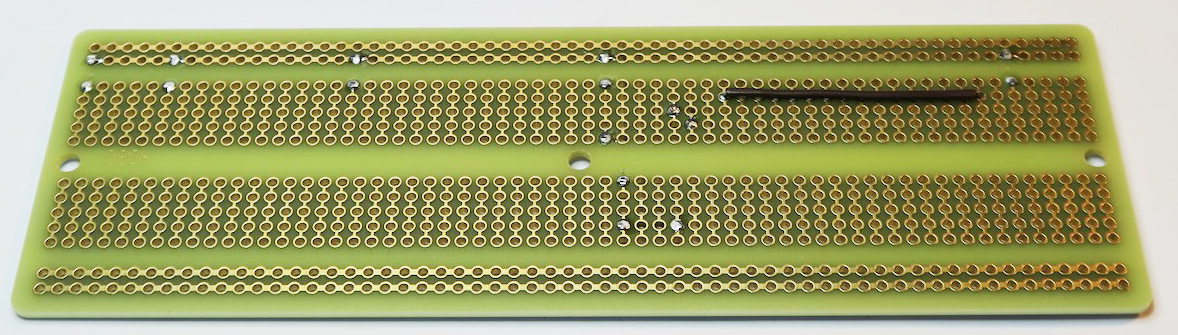
Step 2: Brown Wire:
Back: Connect point to point.
☐ B39 - B54
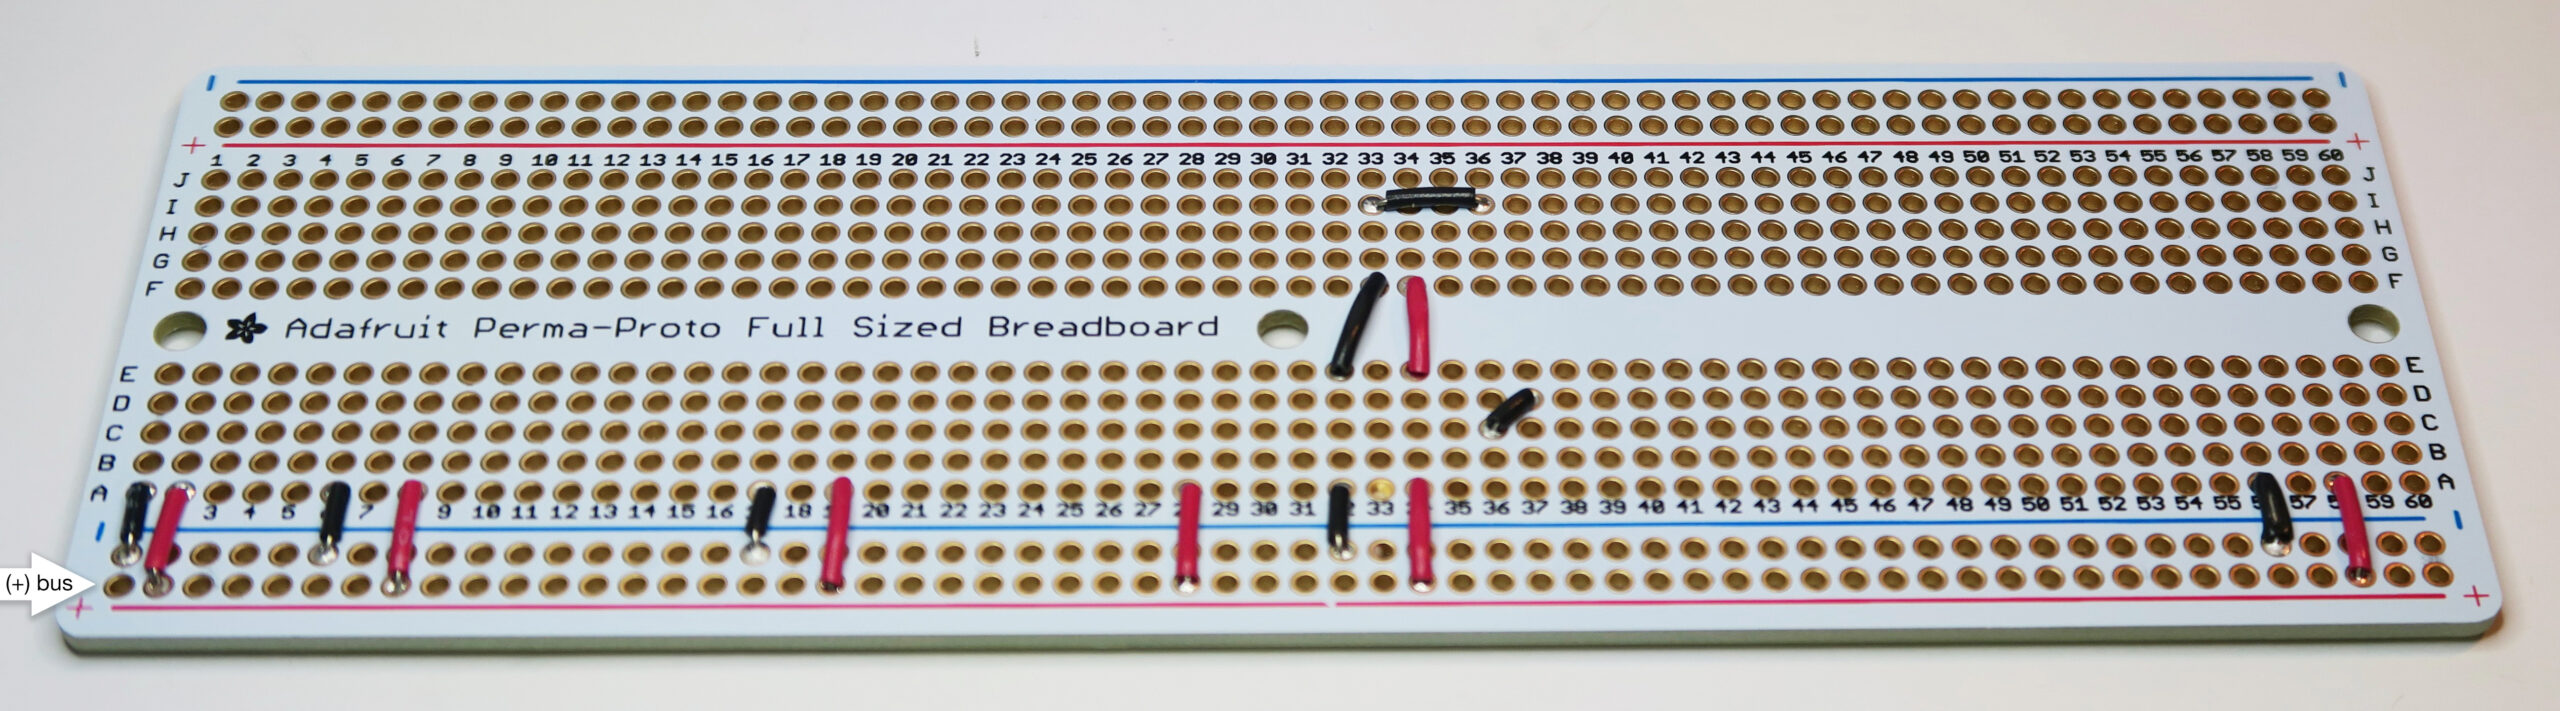
Step 3: Power (red wire):
Front: Connect each position to the (+) bus, below the A row.
☐ A2
☐ A8
☐ A19
☐ A28
☐ A34
☐ A58
Front: Connect point to point:
☐ E34 - F34
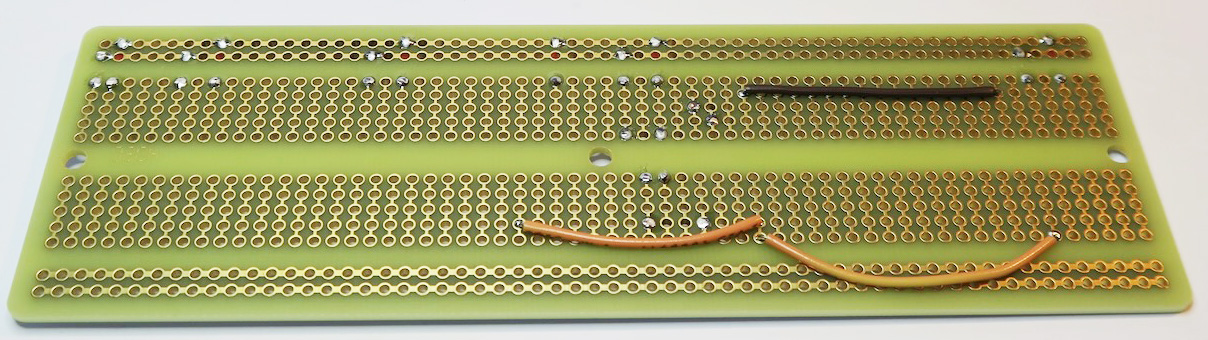
Step 4: Orange Wires:
Back: Connect point to point:
☐ I26 - I39
☐ J39 - J55 (leave slack)
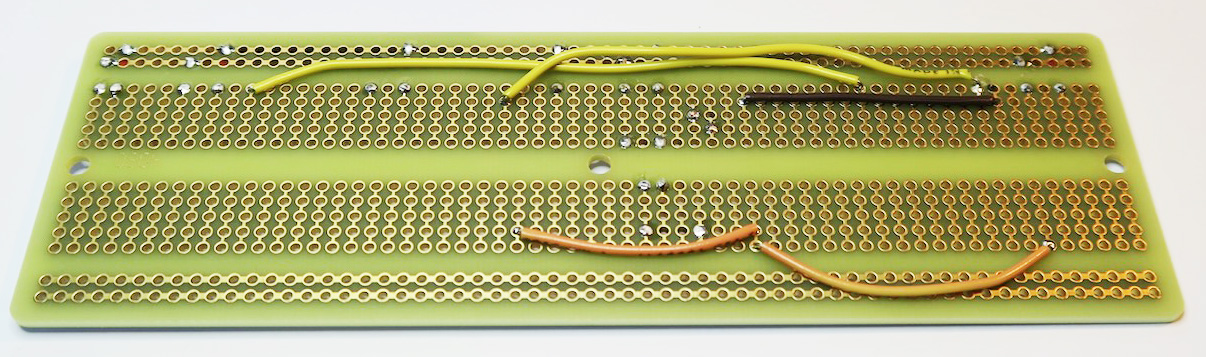
Step 5: Yellow Wires:
Back: Connect point to point:
☐ A10 - A46 (leave slack)
☐ B25 - A53 (leave slack)
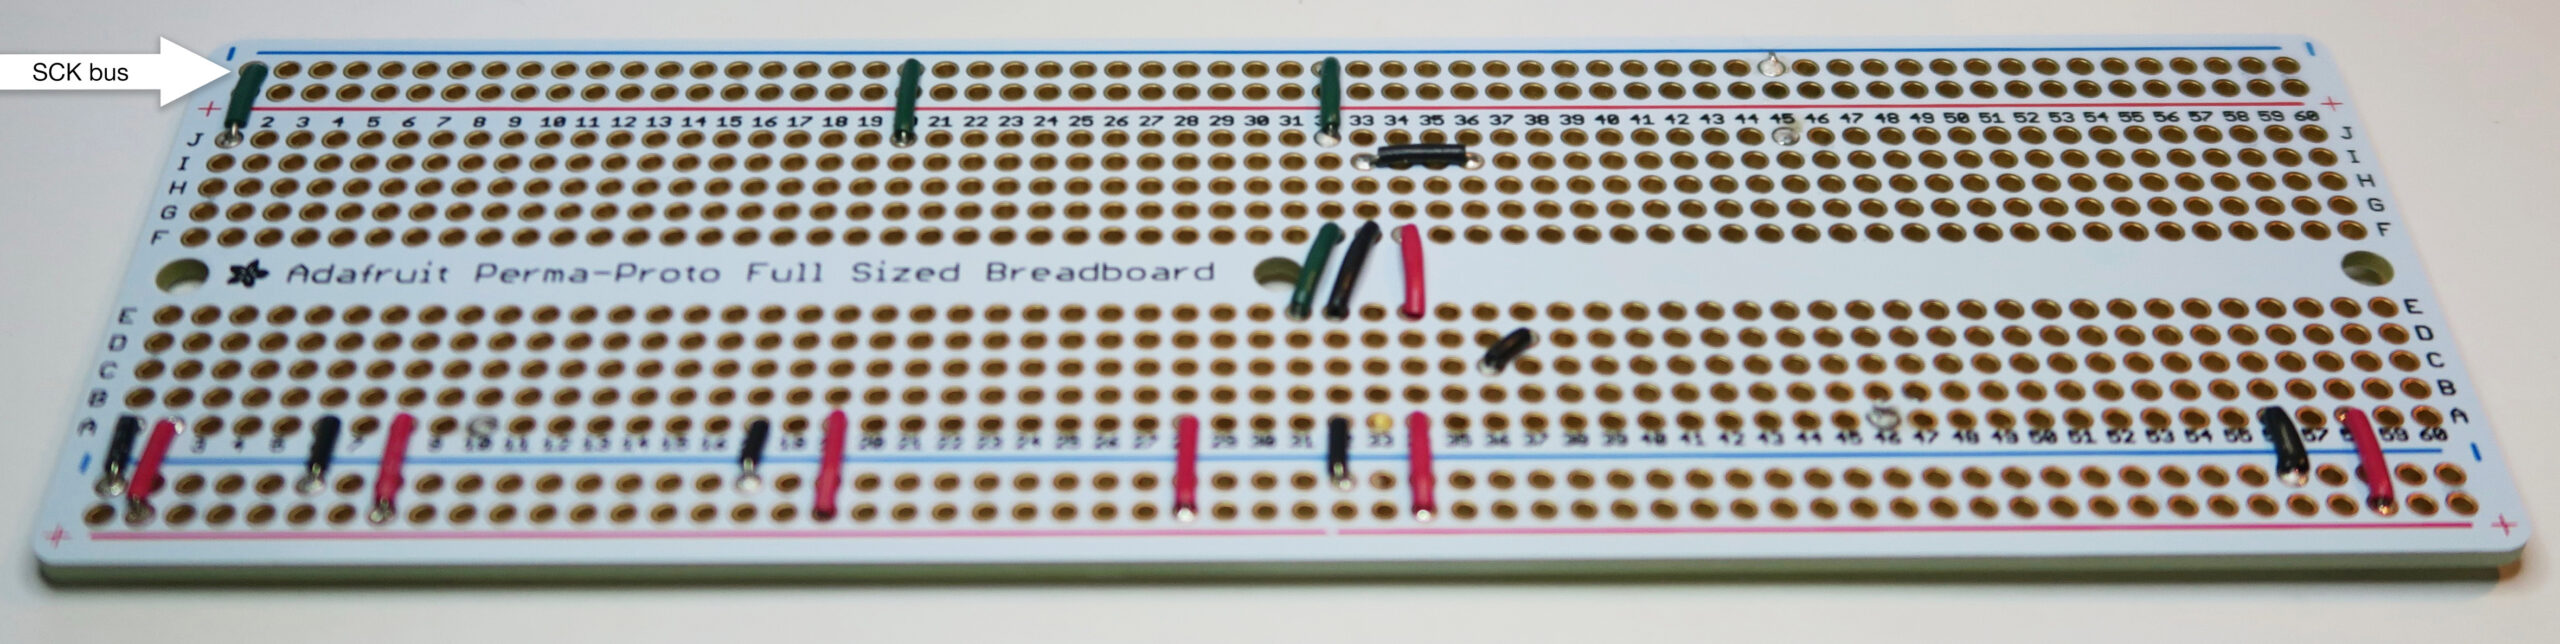
Step 6: SCK (I2C Serial ClocK) (green wire):
Front: Connect each to the (-) bus above the J row.
☐ J1
☐ J20
☐ J32.
Front: Connect point to point
☐ E31 - F32.
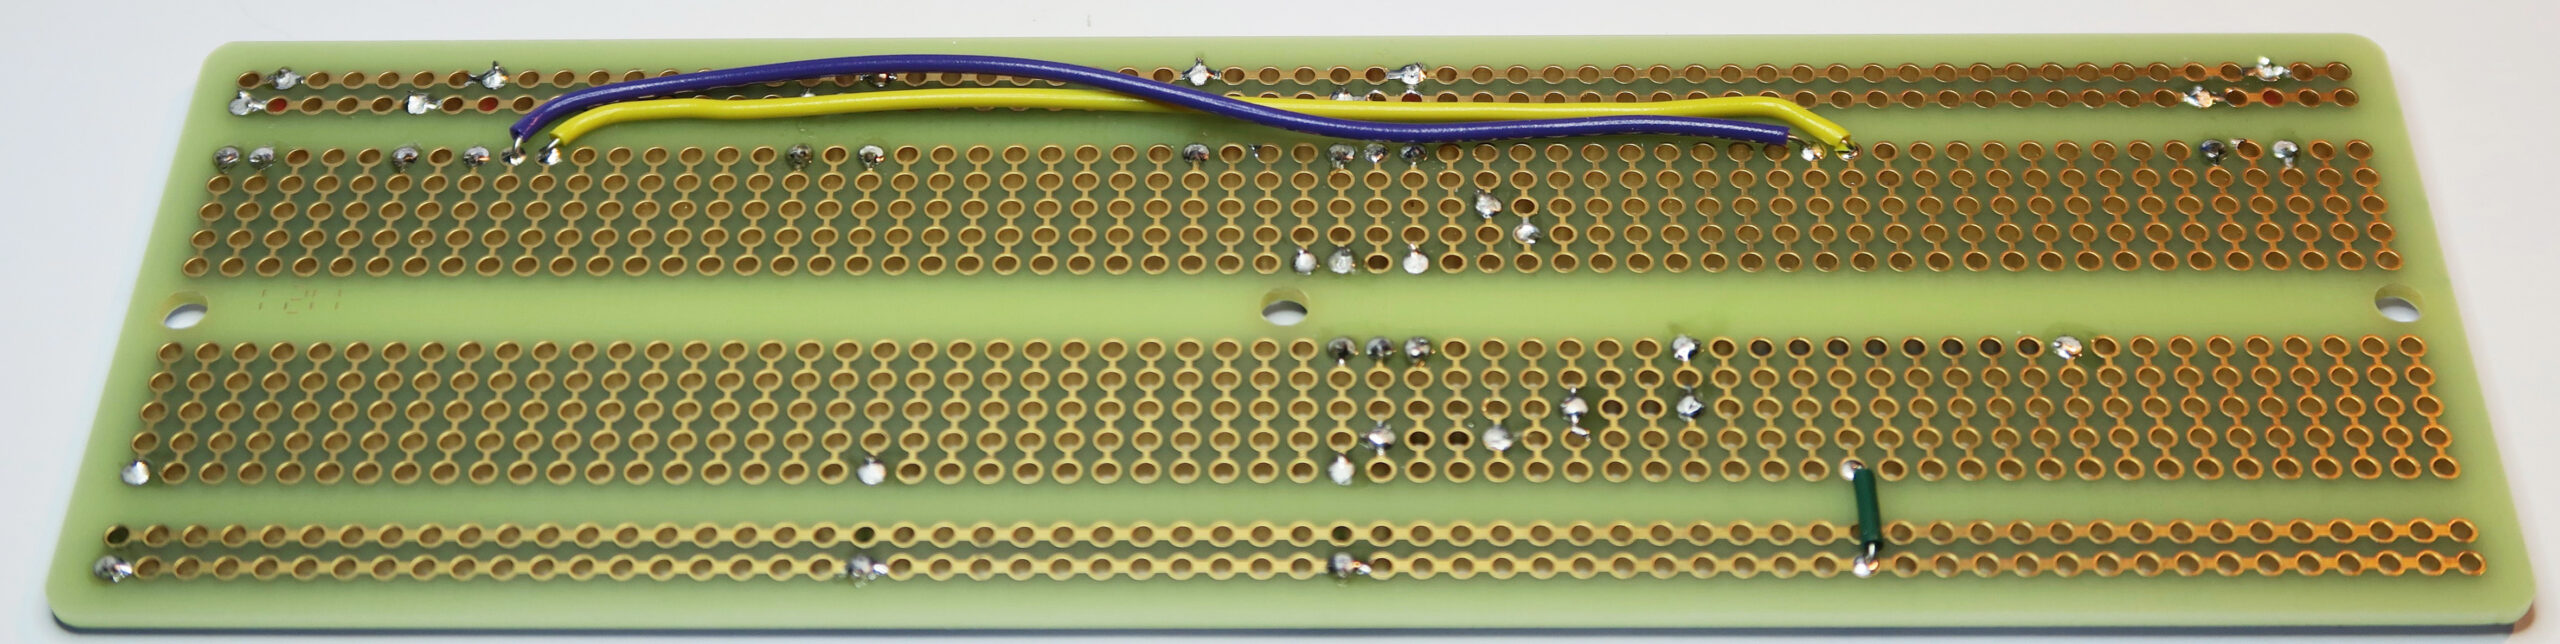
Back: Connect to the (-) bus above the J row, on the back of the board.
☐ J45
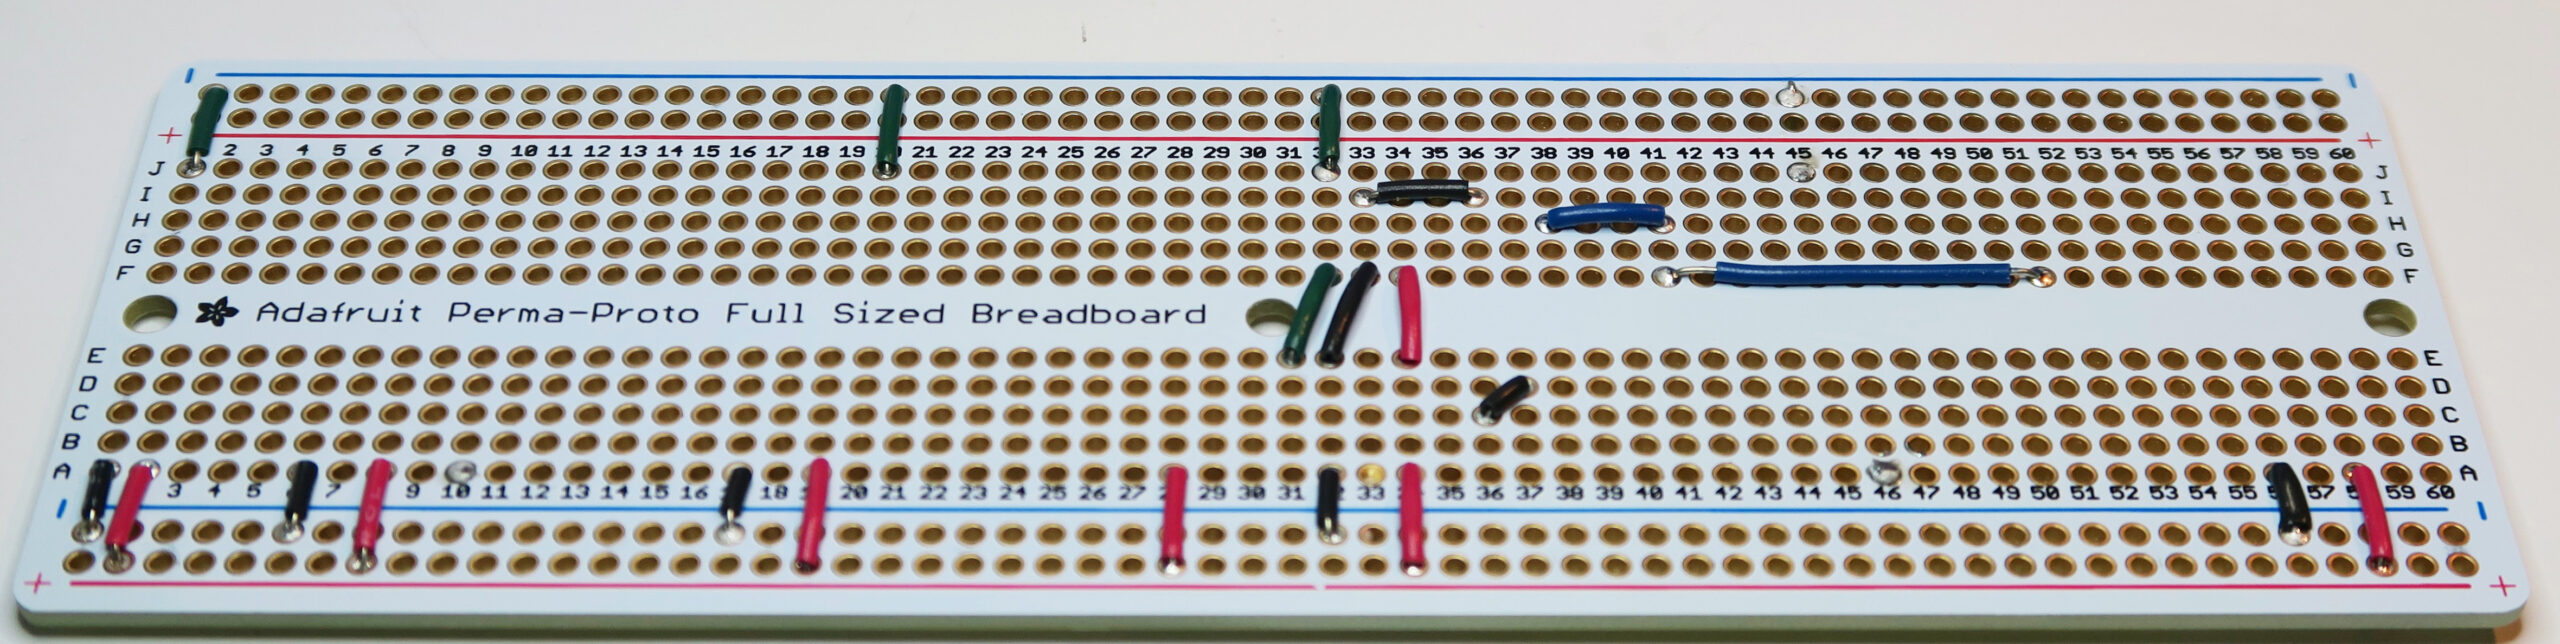
Step 7: Pushbutton wiring (blue wire):
Front: Connect point to point.
☐ H38 - H41
☐ F41 - F51
Step 8: Connect the main TX (receive) line for the two UART channels
Back: Connect point to point.
☐ A9 - A45 (leave slack)
☐ B24 - B52 (leave slack)
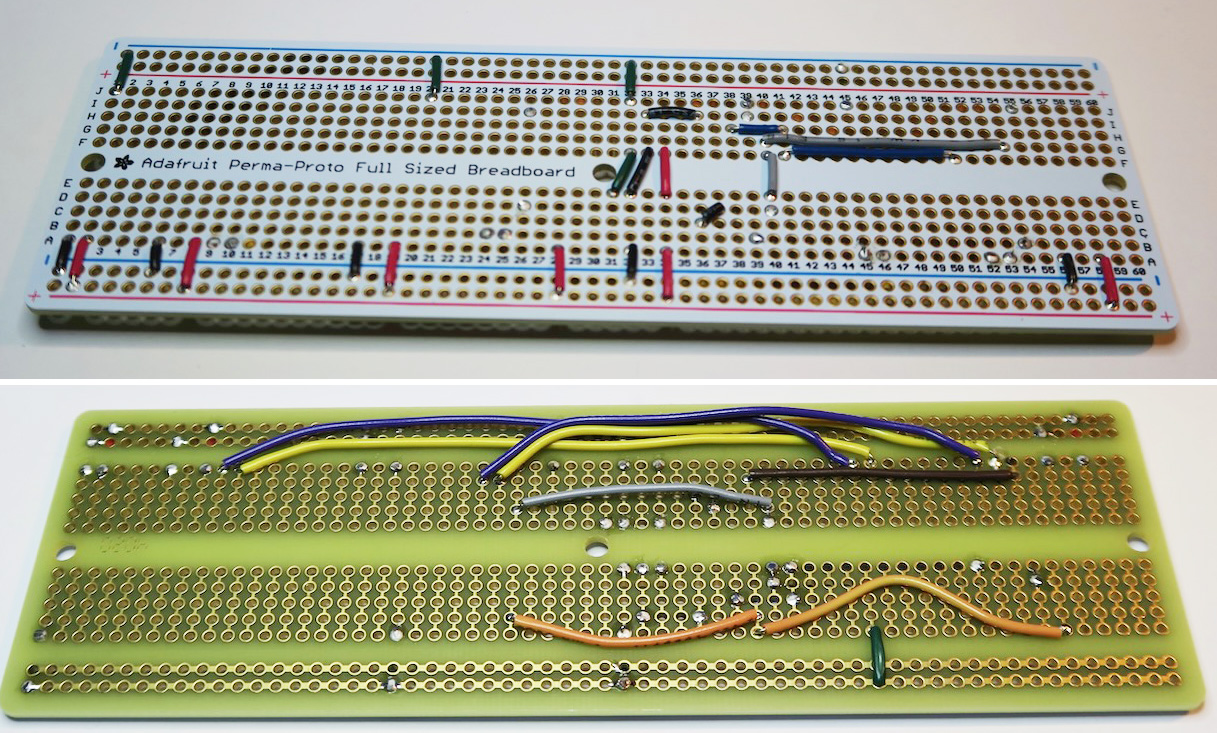
Step 9: Enable (grey wire):
Front: Connect point to point.
☐ E40 - F40
☐ G40 - G54
Back: Connect point to point.
☐ D40 - D26 (leave slack)

Step 10: SDA (I2C Serial Data) (white wire):
Front: Connect each wire to the (+) bus above the J row.
☐ J2
☐ J21
☐ J31
Front: Connect point to point.
☐ E29 - F31.
Back: Connect to the (+) bus above the J row, on the back of the board.
☐ J44
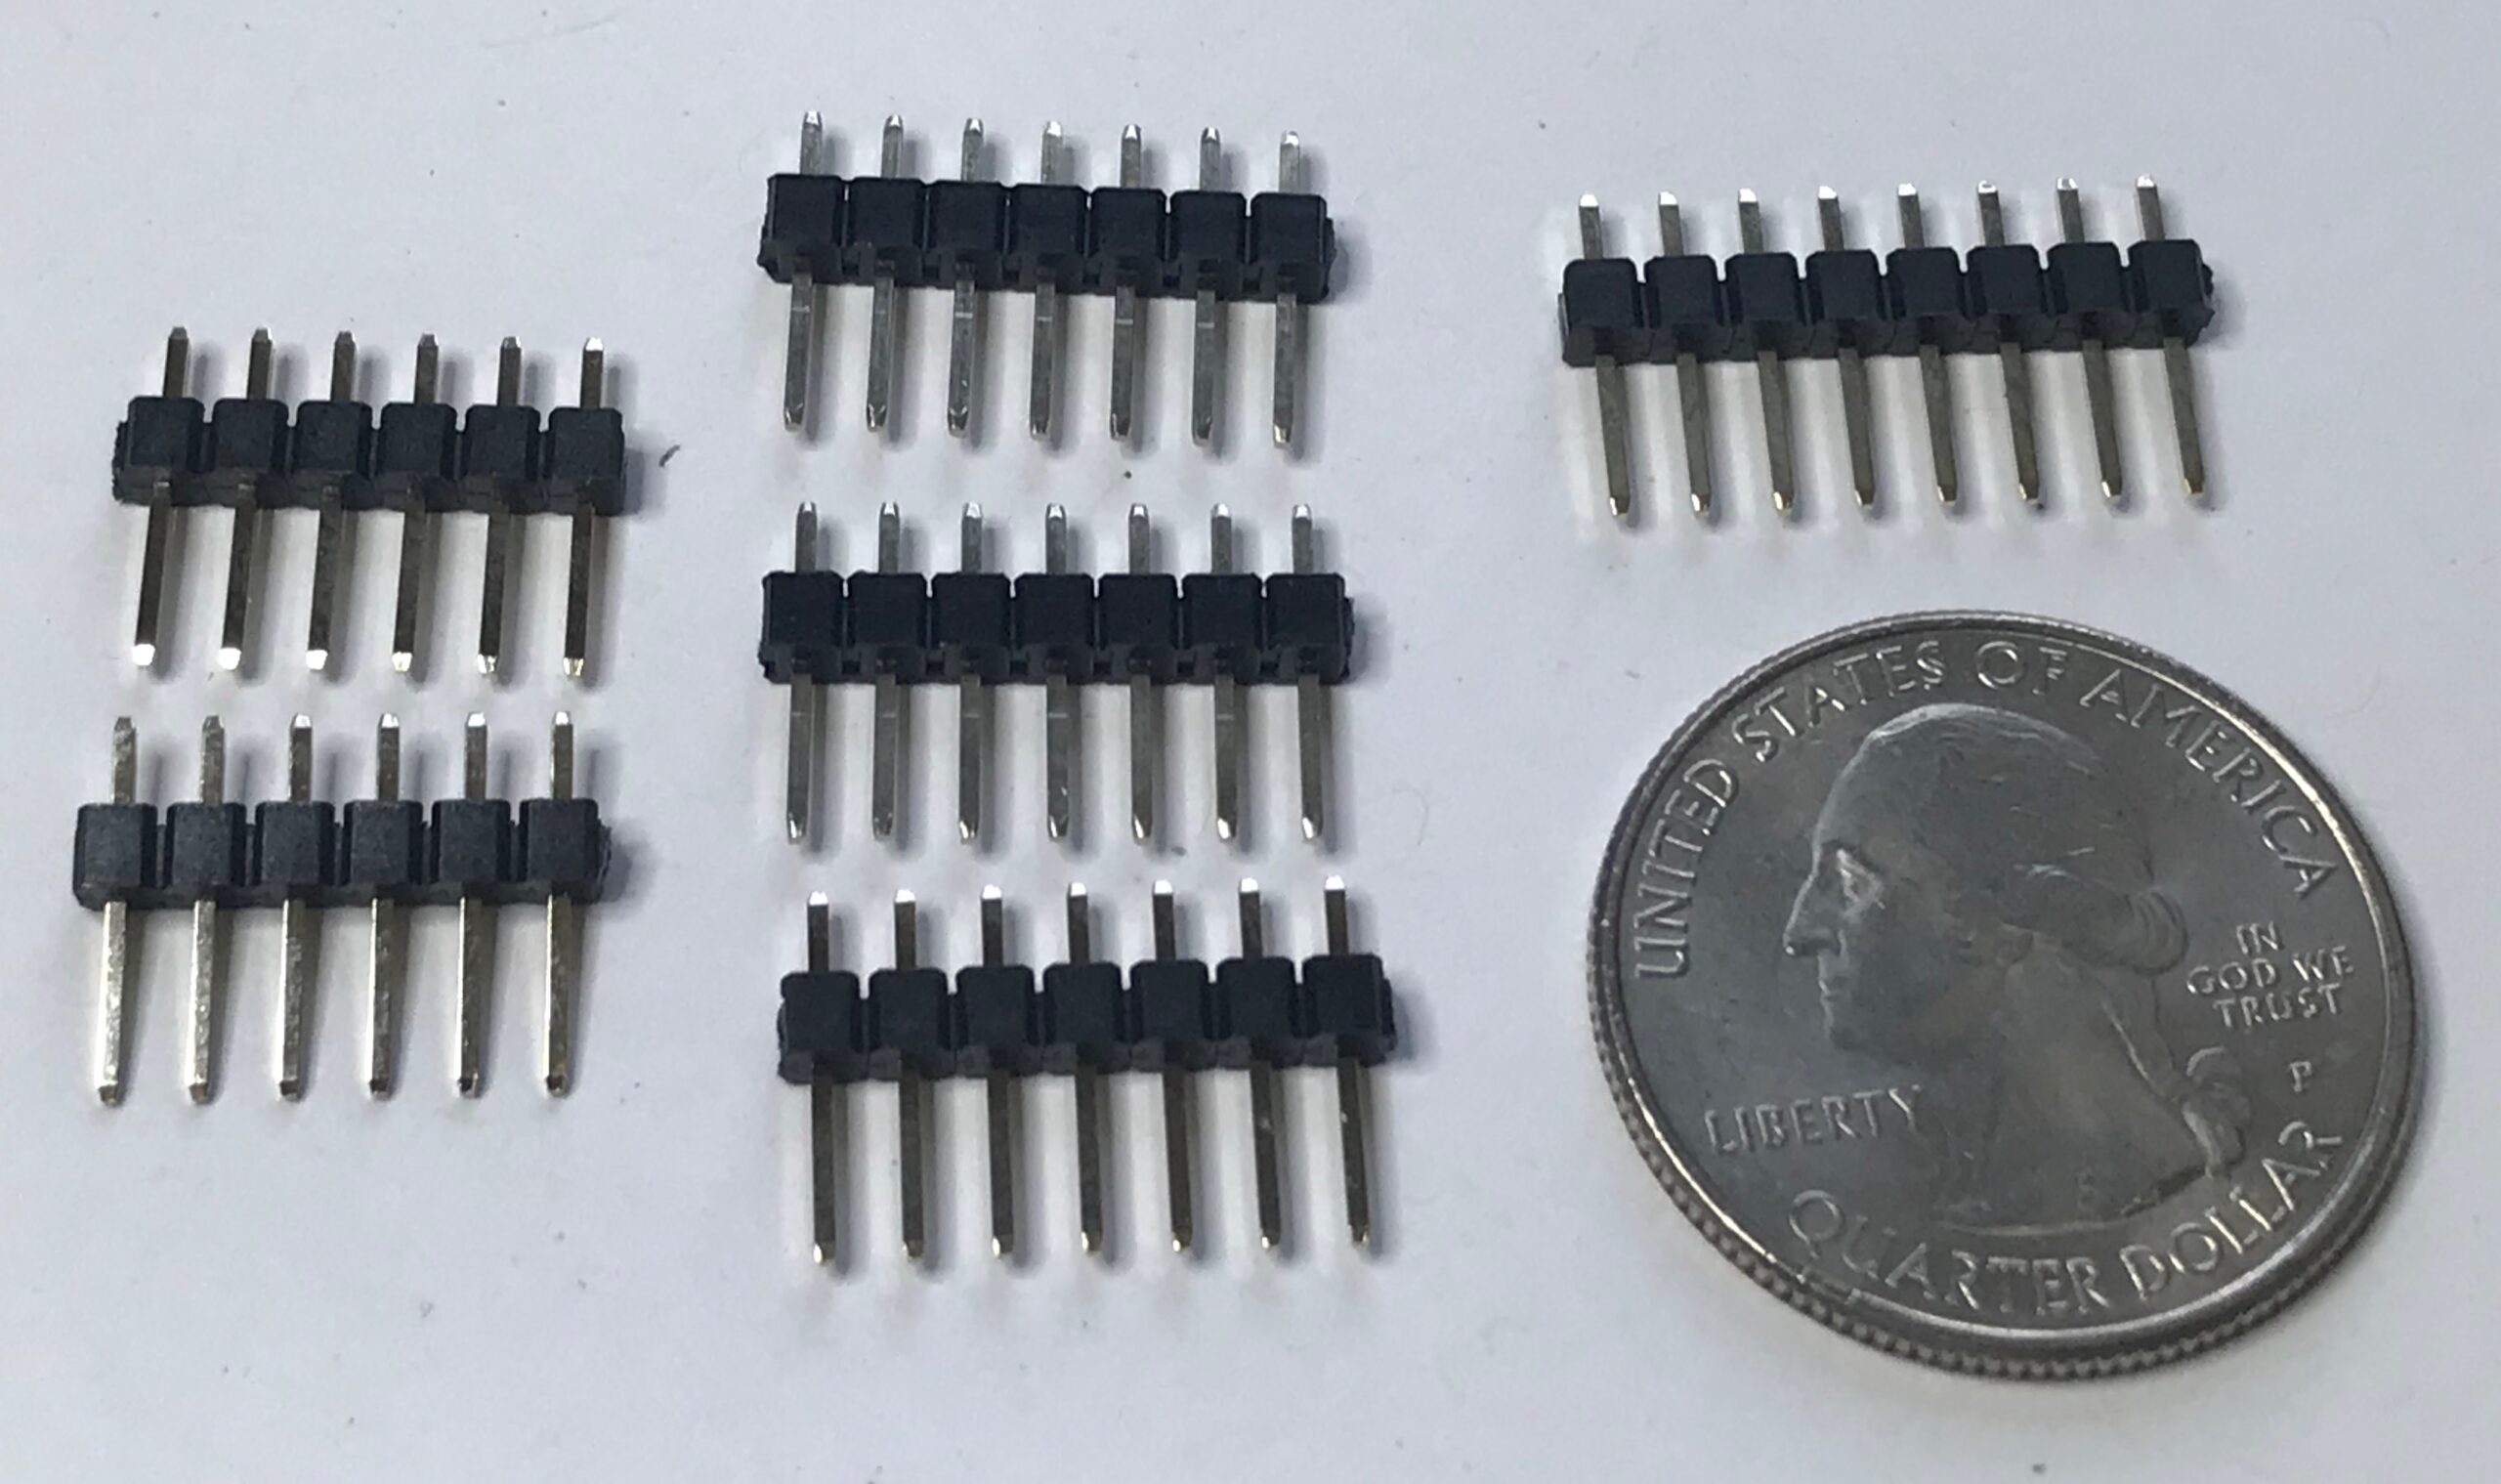
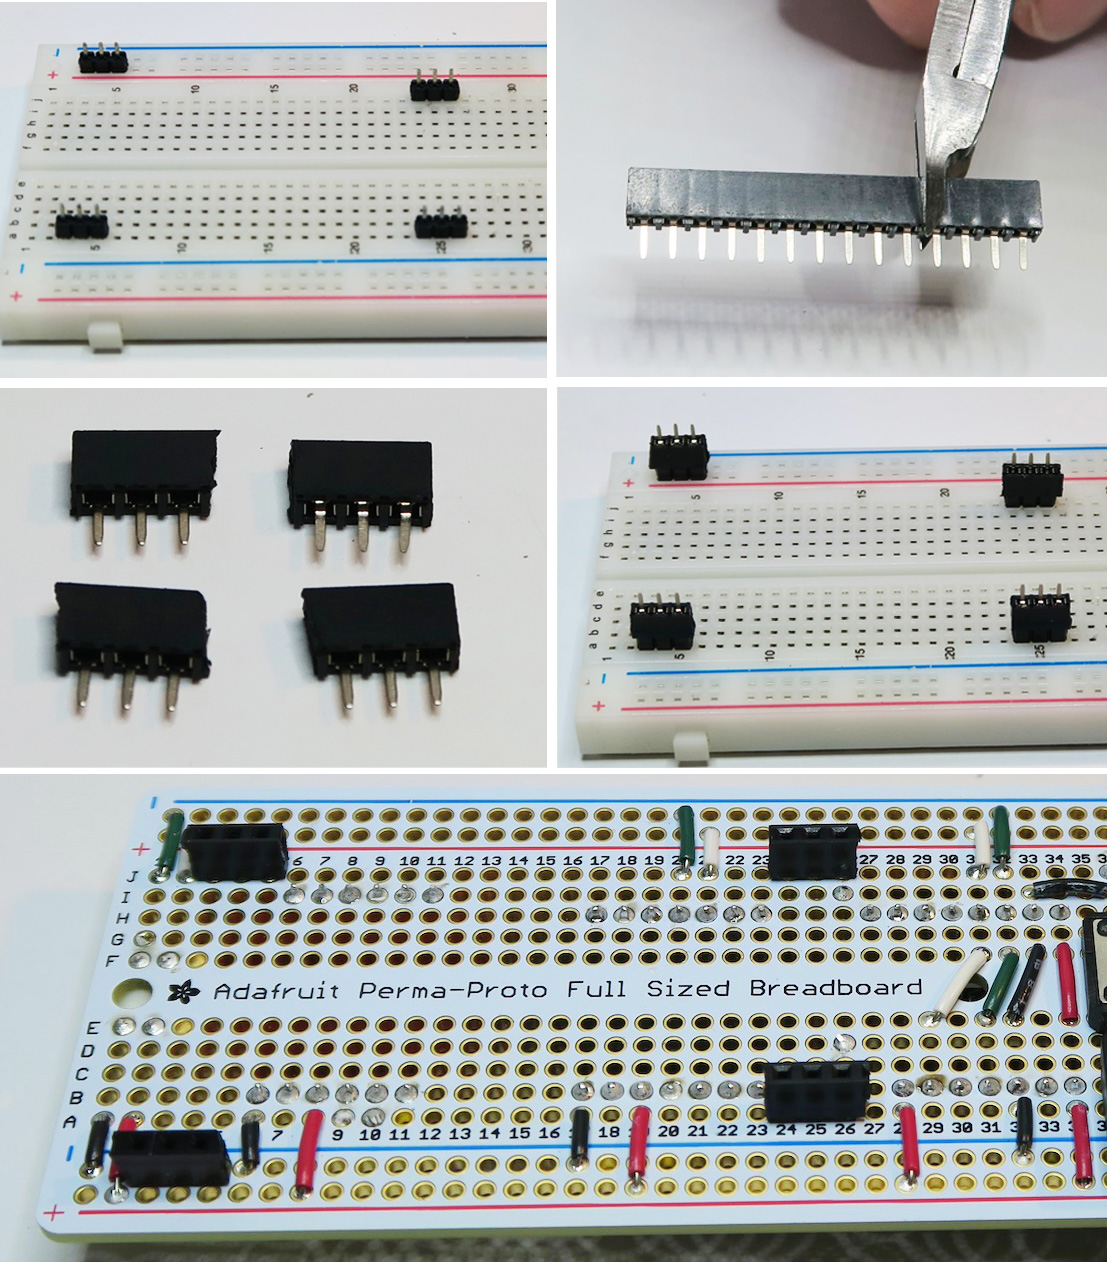
Step 1: Prepare headers
Trim or snap to length.
☐ 2 pieces at 6 pins long
☐ 3 pieces at 7 pins long
☐ 1 piece at 8 pins long

Step 2: Push headers into breadboard
Push the shorter end of the pins into the breadboard. It's a bit tricky to get them to stay.
☐ 6-11 B (6 pins)
☐ 6-11 I (6 pins)
☐ 17-23 B (7 pins)
☐ 17-23 H (7 pins)
☐ 28-34 B (7 pins)
☐ 27-34 H (8 pins)
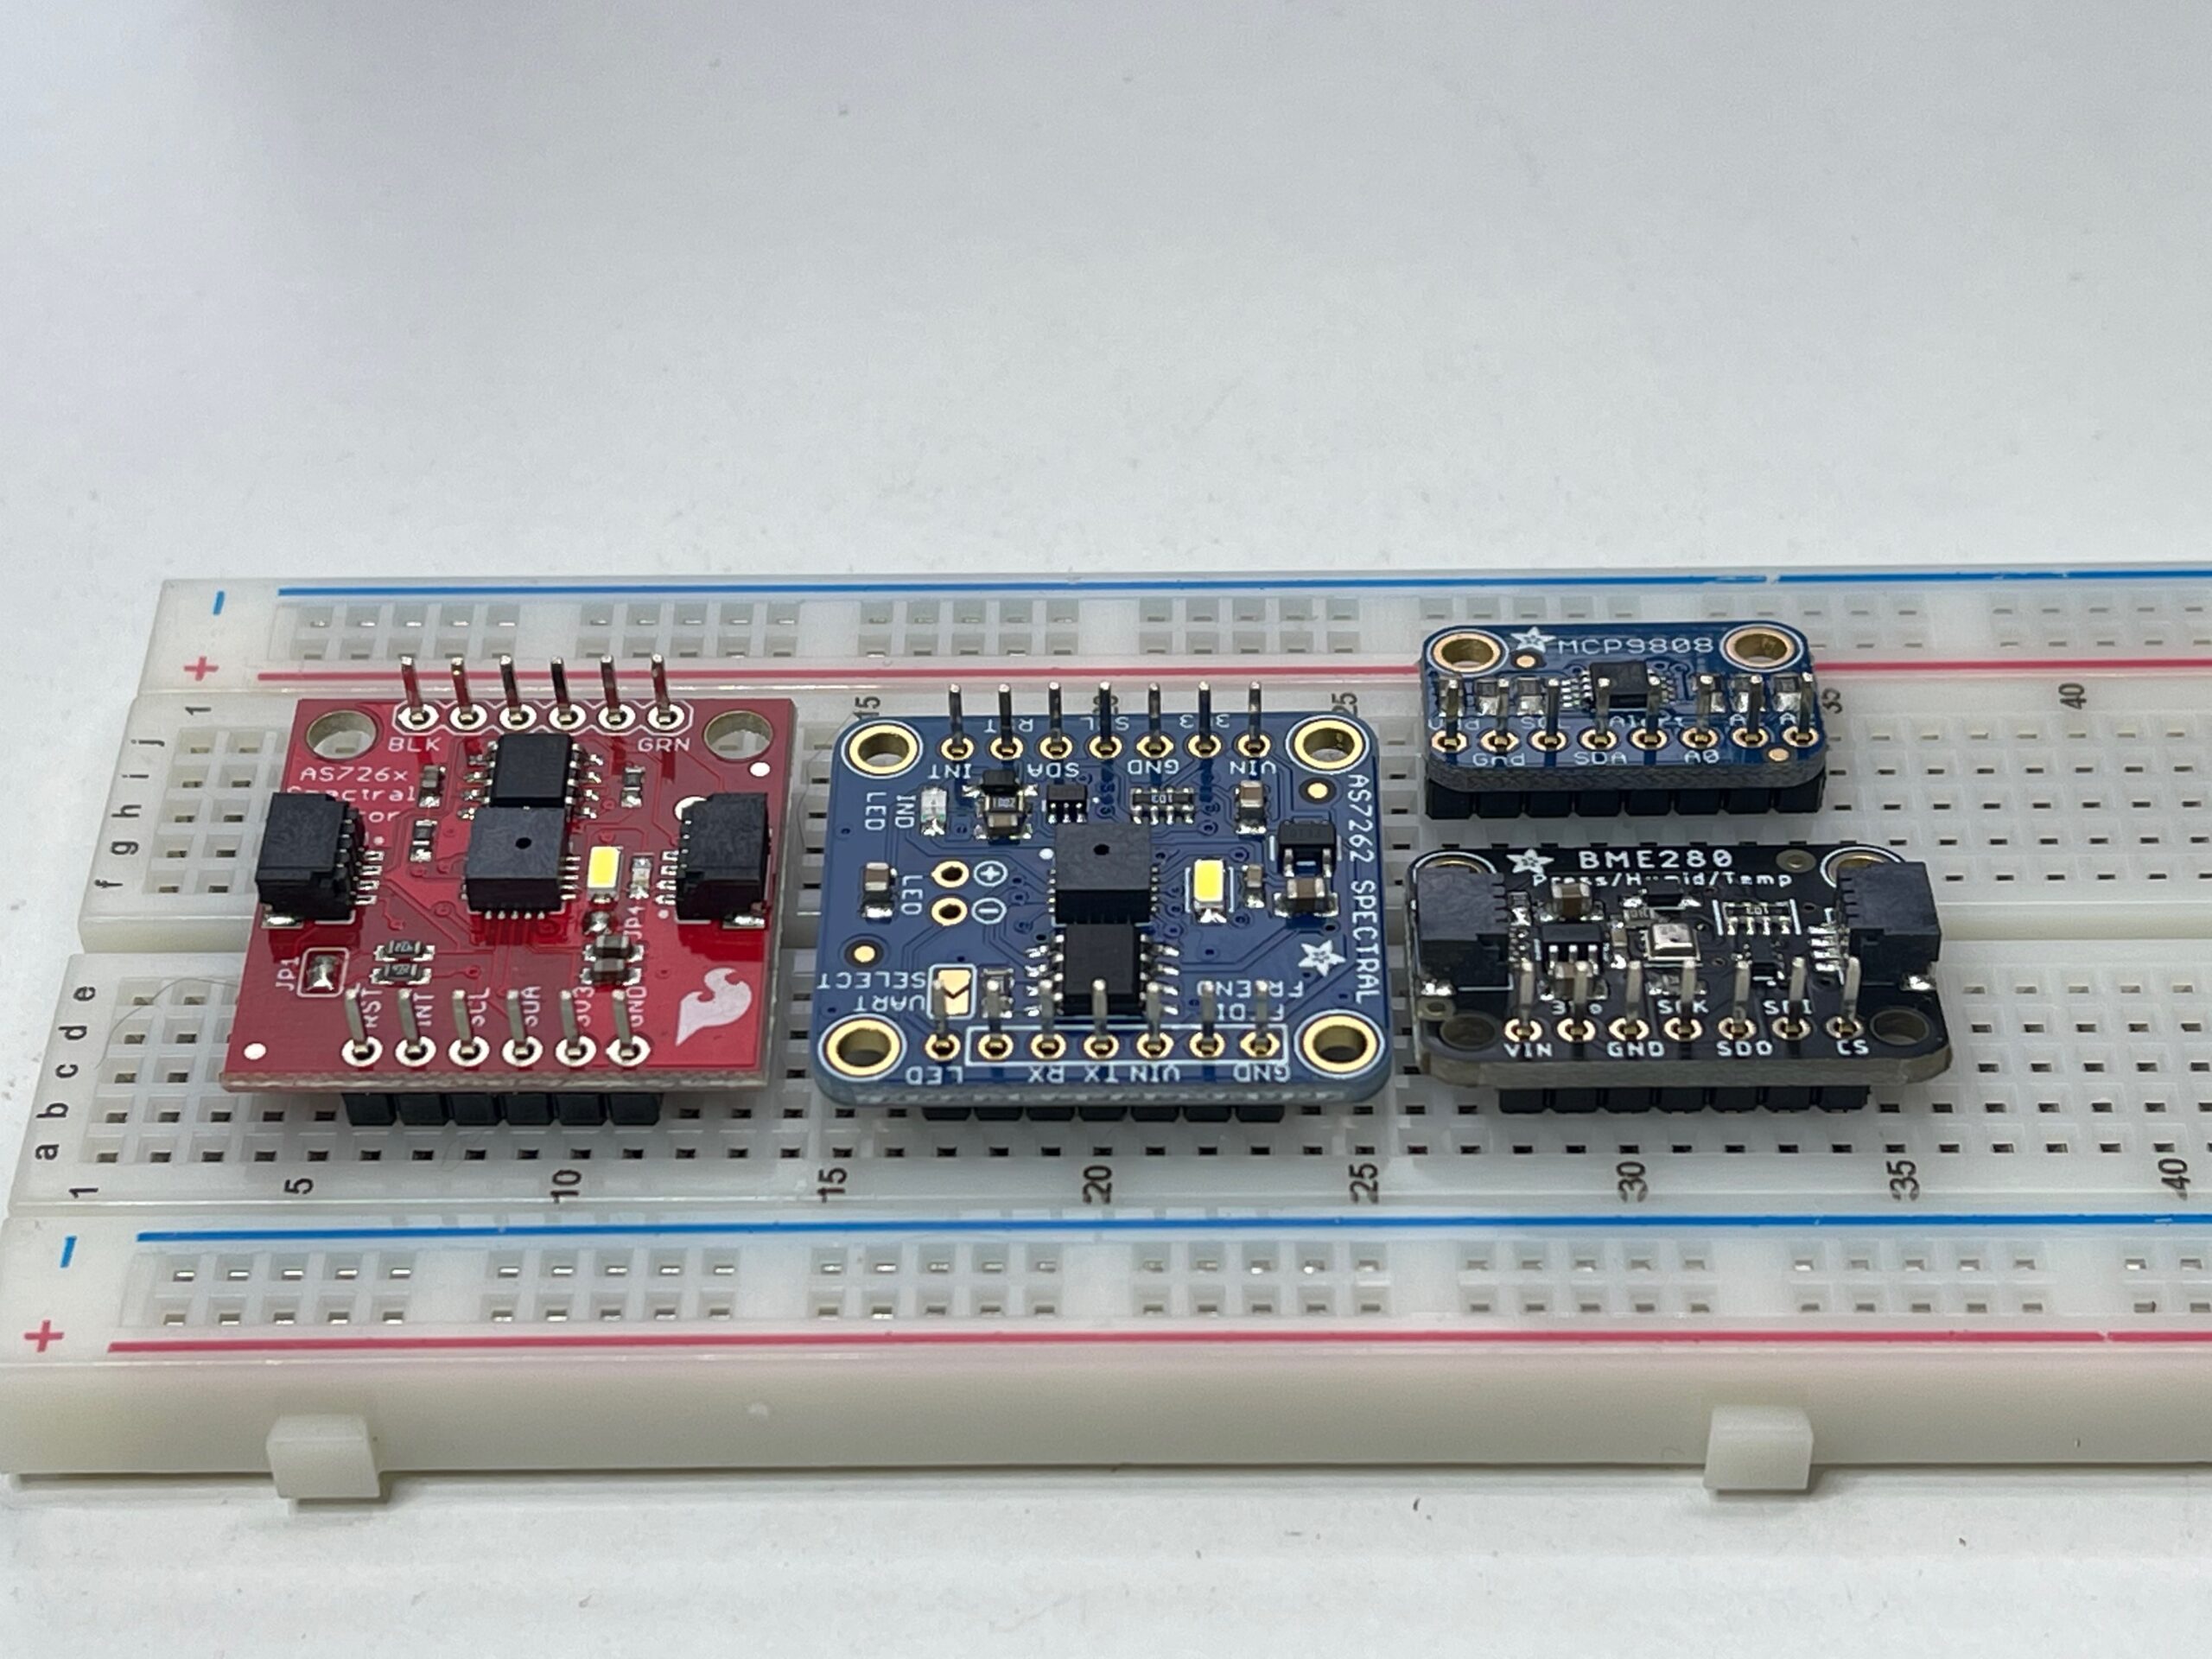
Step 3: Confirm the header placement.
Temporarily place the sensors, as a fit-check. DO NOT solder the sensors to the pins at this step. Remove the sensors after the fit check.
Step 4: Solder the header pins onto the breadboard.
☐ Lay the protoboard on top of the pins on the breadboard. Use the helper spacer under the far end of the proto board to keep the board flat.
☐ Confirm the alignment by checking pins show in holes B6-11, B17-23, and B28-34.
☐ Solder. B6-11, I6-11, B17-23, H17-23, B28-34, H27-34.
☐ Remove the protoboard from the breadboard, by rocking gently but firmly, to separate the two without bending the header pins.
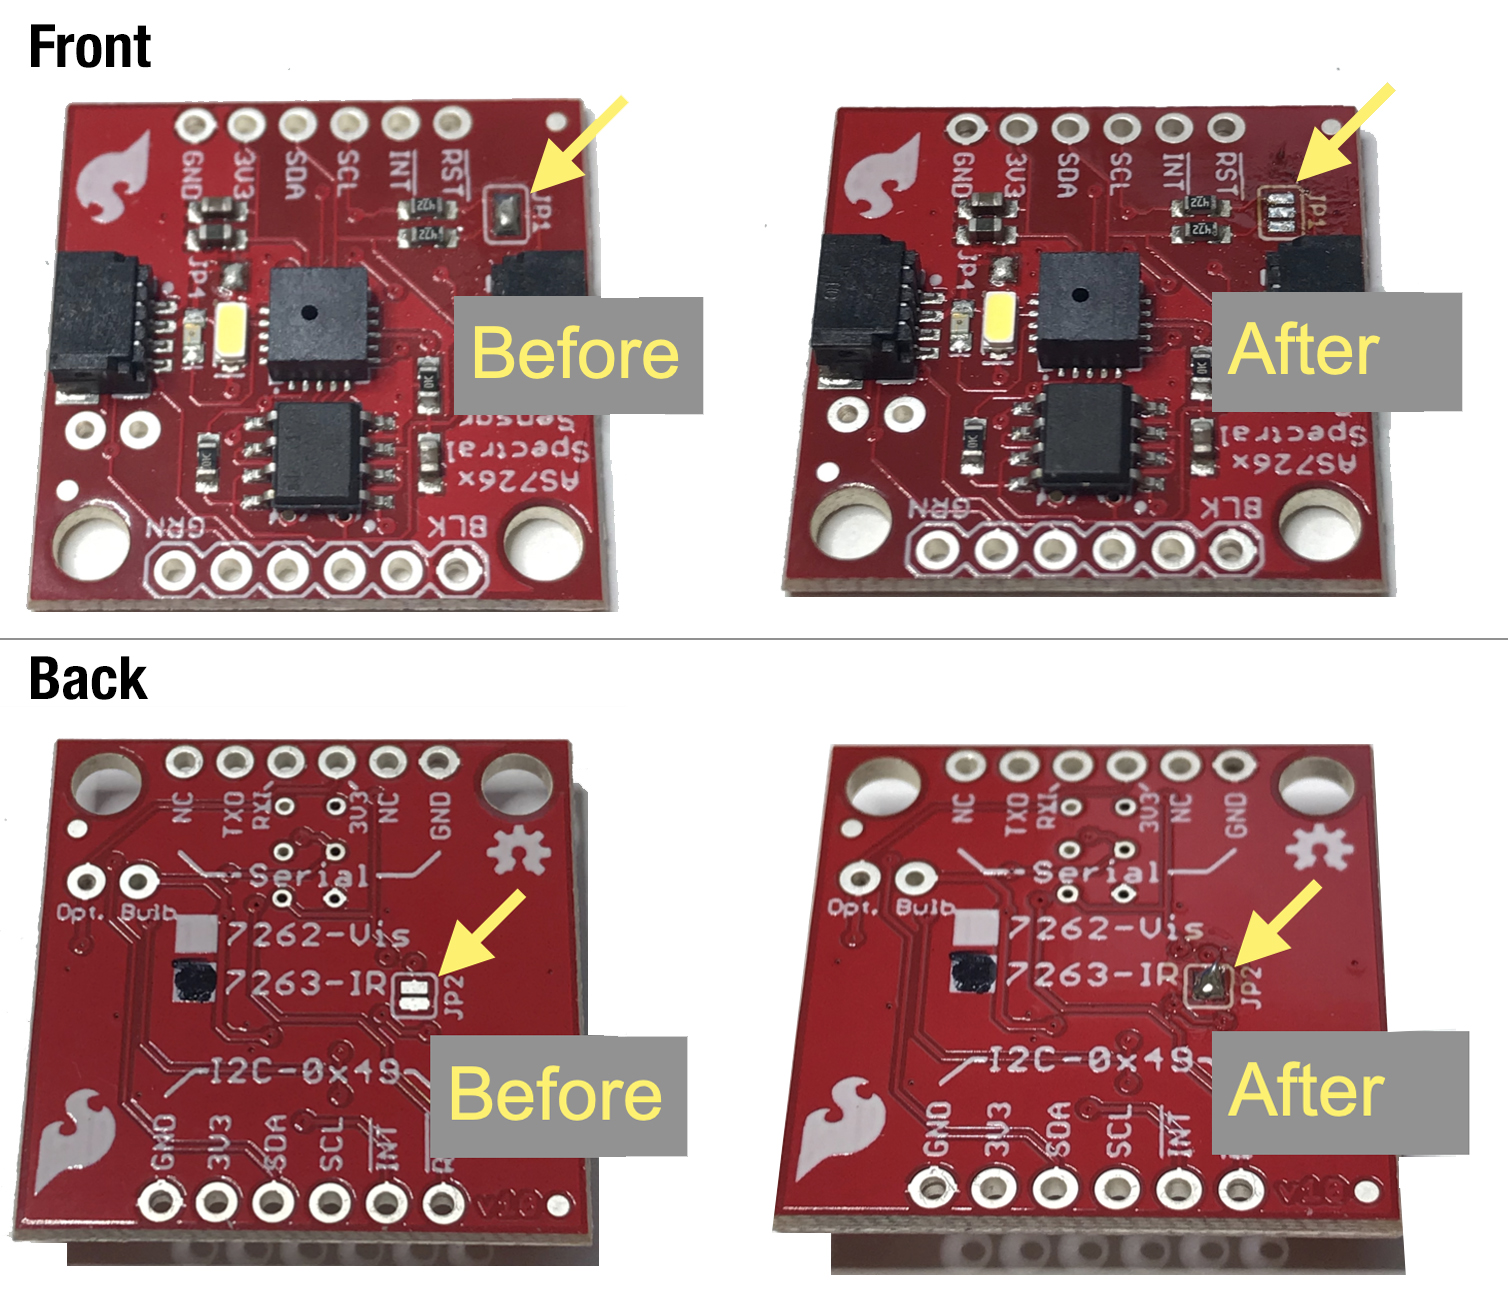
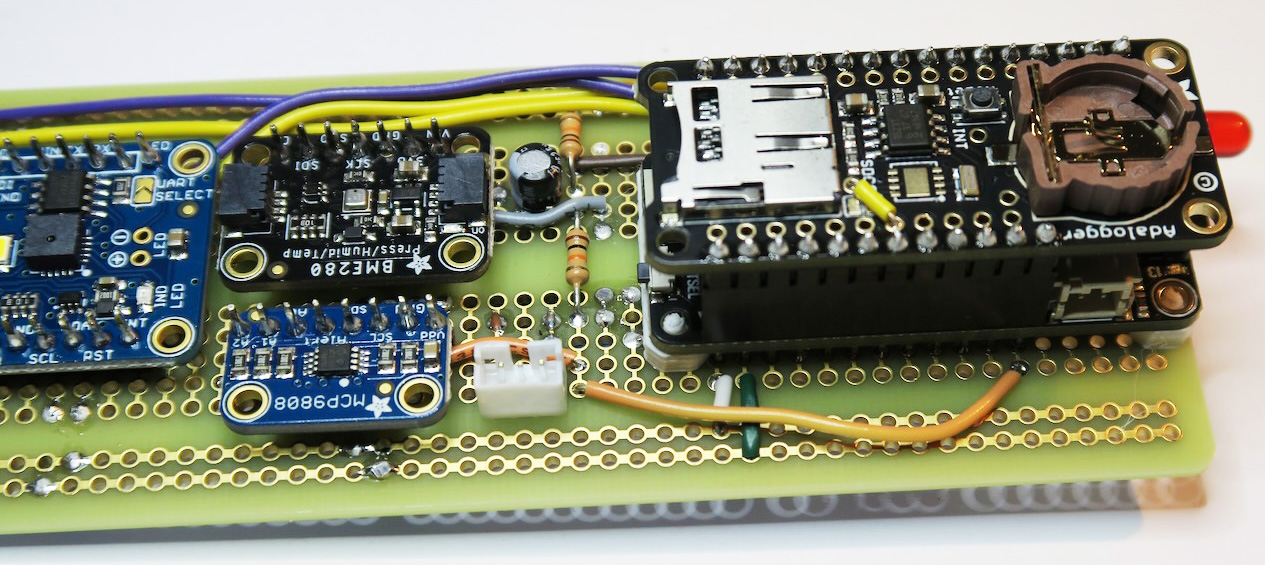
Step 1: Modify the NIR sensor
☐ Remove solder from jumper set JP1 (on the component side of the board)
☐ Add solder to the jumper JP2 (on the back of the board)
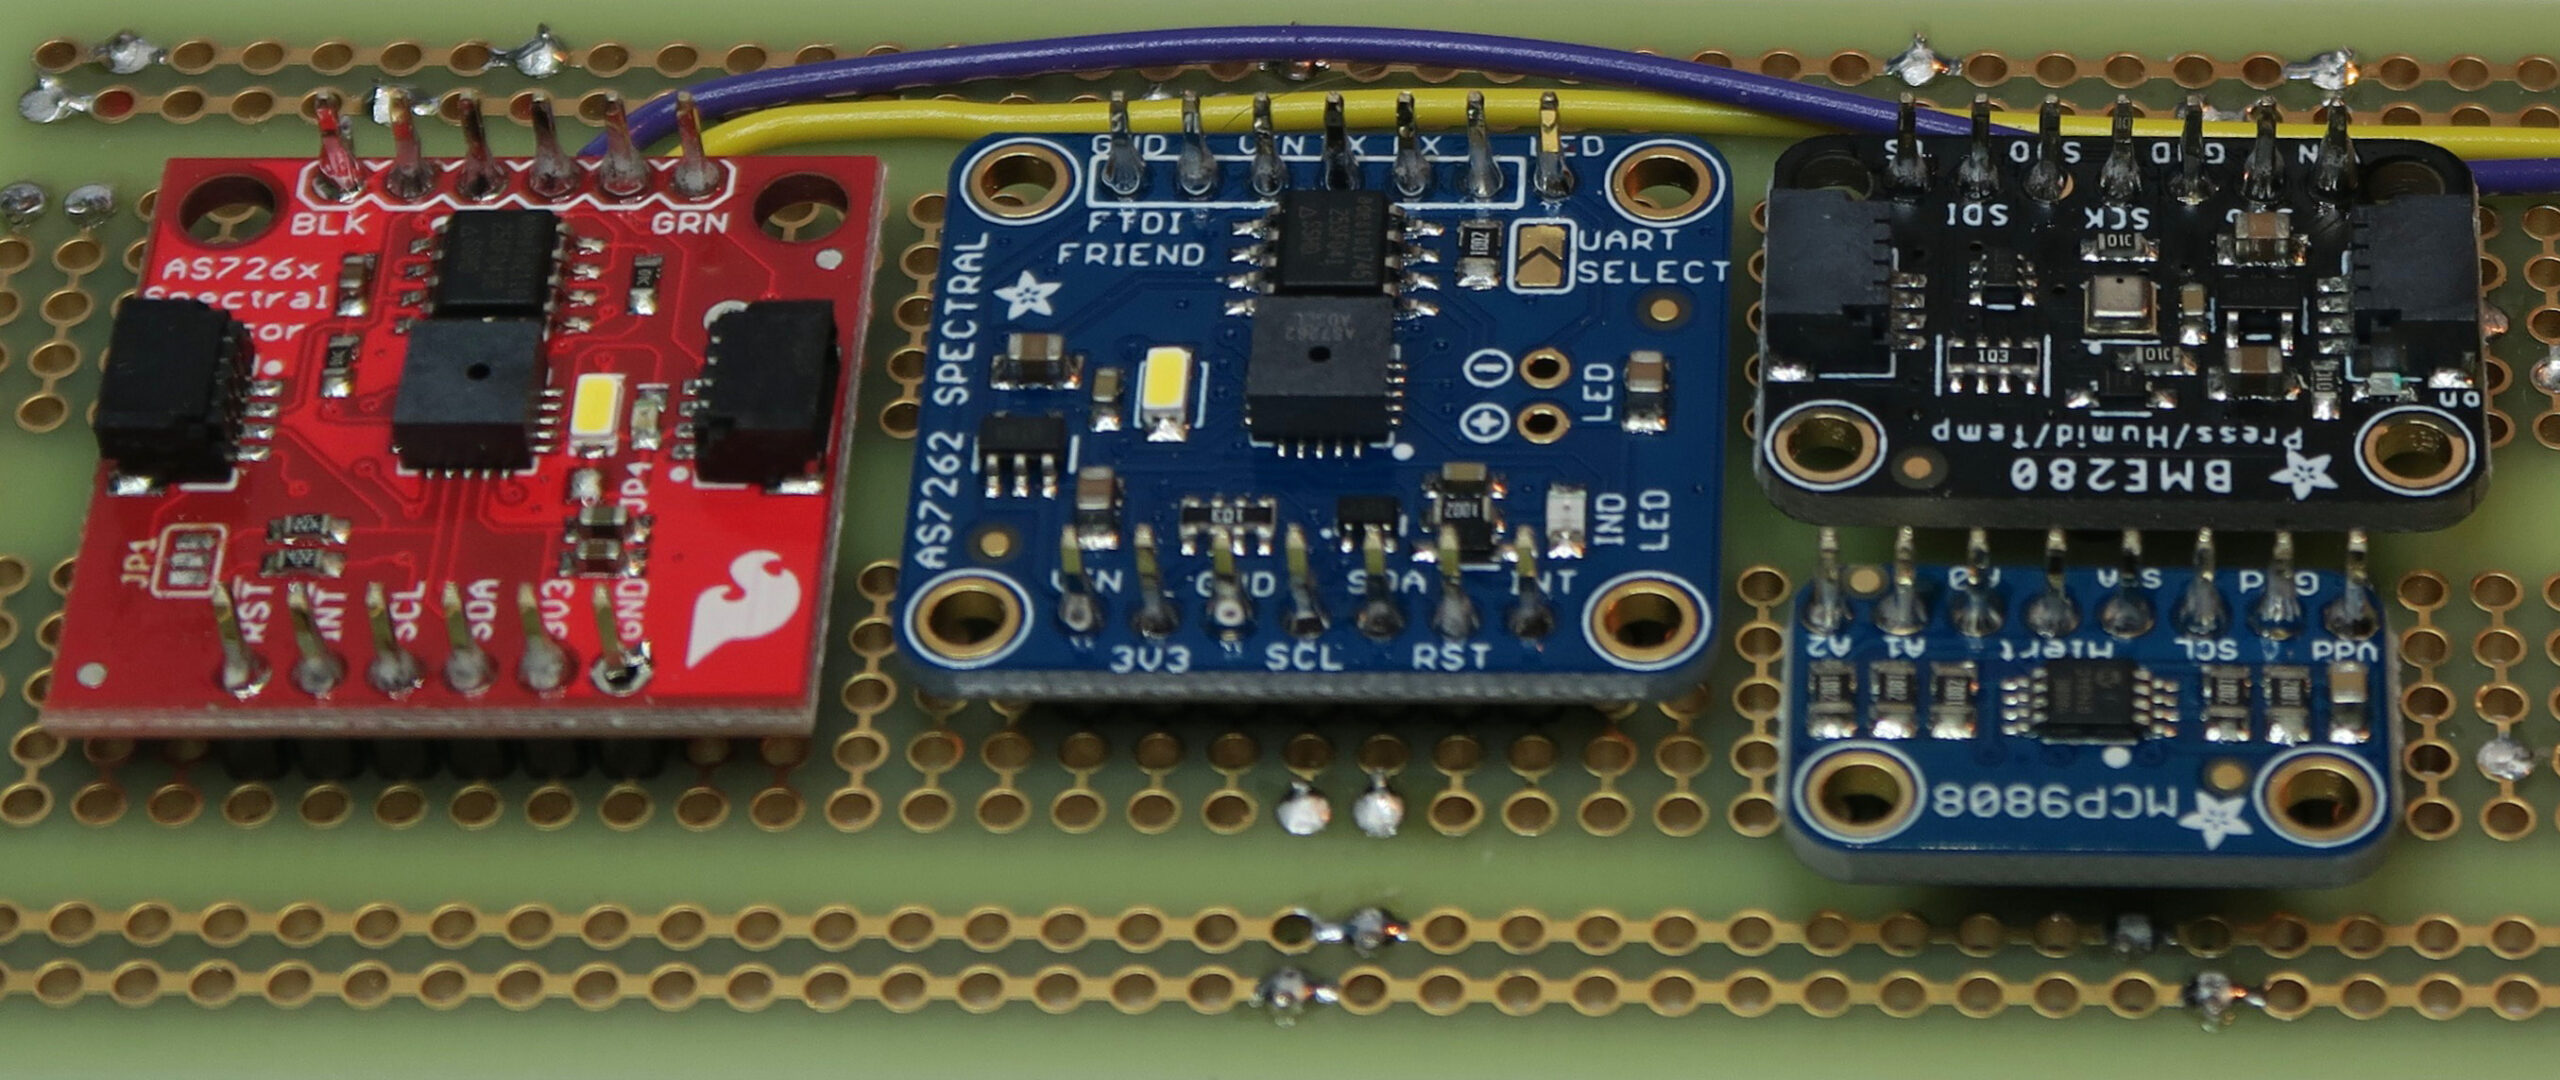
Step 2: Install the Air, Weather, Visible and NIR Sensors
Reminder: Make sure you modified the NIR sensor before proceeding. It's important to make this modification before mounting the sensor, as there is no access to the underside of the sensor (JP2) once it's installed.
☐ Install the Air Temperature sensor face up, on the back of the main board, on the header with 8 pins. Orient the sensor so that it sticks out towards the SCK and SDA connections. To get it to sit flat, solder one pin only, at first. Then remelt that solder connection and lift the sensor board by hand to make it flat. Remove the soldering iron and let the connection cool. Then solder the rest of the connections. Solder 8 places total.
☐ Install the Weather sensor face up, on the back of the main board, on the header with 7 pins, across from the AT sensor. Orient the sensor so that it sticks inwards towards the AT sensor. To get it to sit flat, solder one pin only, at first. Then remelt that solder connection and lift the sensor board by hand to make it flat. Remove the soldering iron and let the connection cool. Then solder the rest of the connections. Solder 7 places total.
☐ Install the Visible spectrum sensor next to the two previously installed sensors. Make certain that the auxiliary communications chip is on the same side as the WX sensor. Solder 14 places.
☐ Install the Near Infrared spectrum sensor, next to the VIS sensor. Make certain the auxiliary communications chip is on the same side as the corresponding chip on the VIS sensor. Solder 12 places.
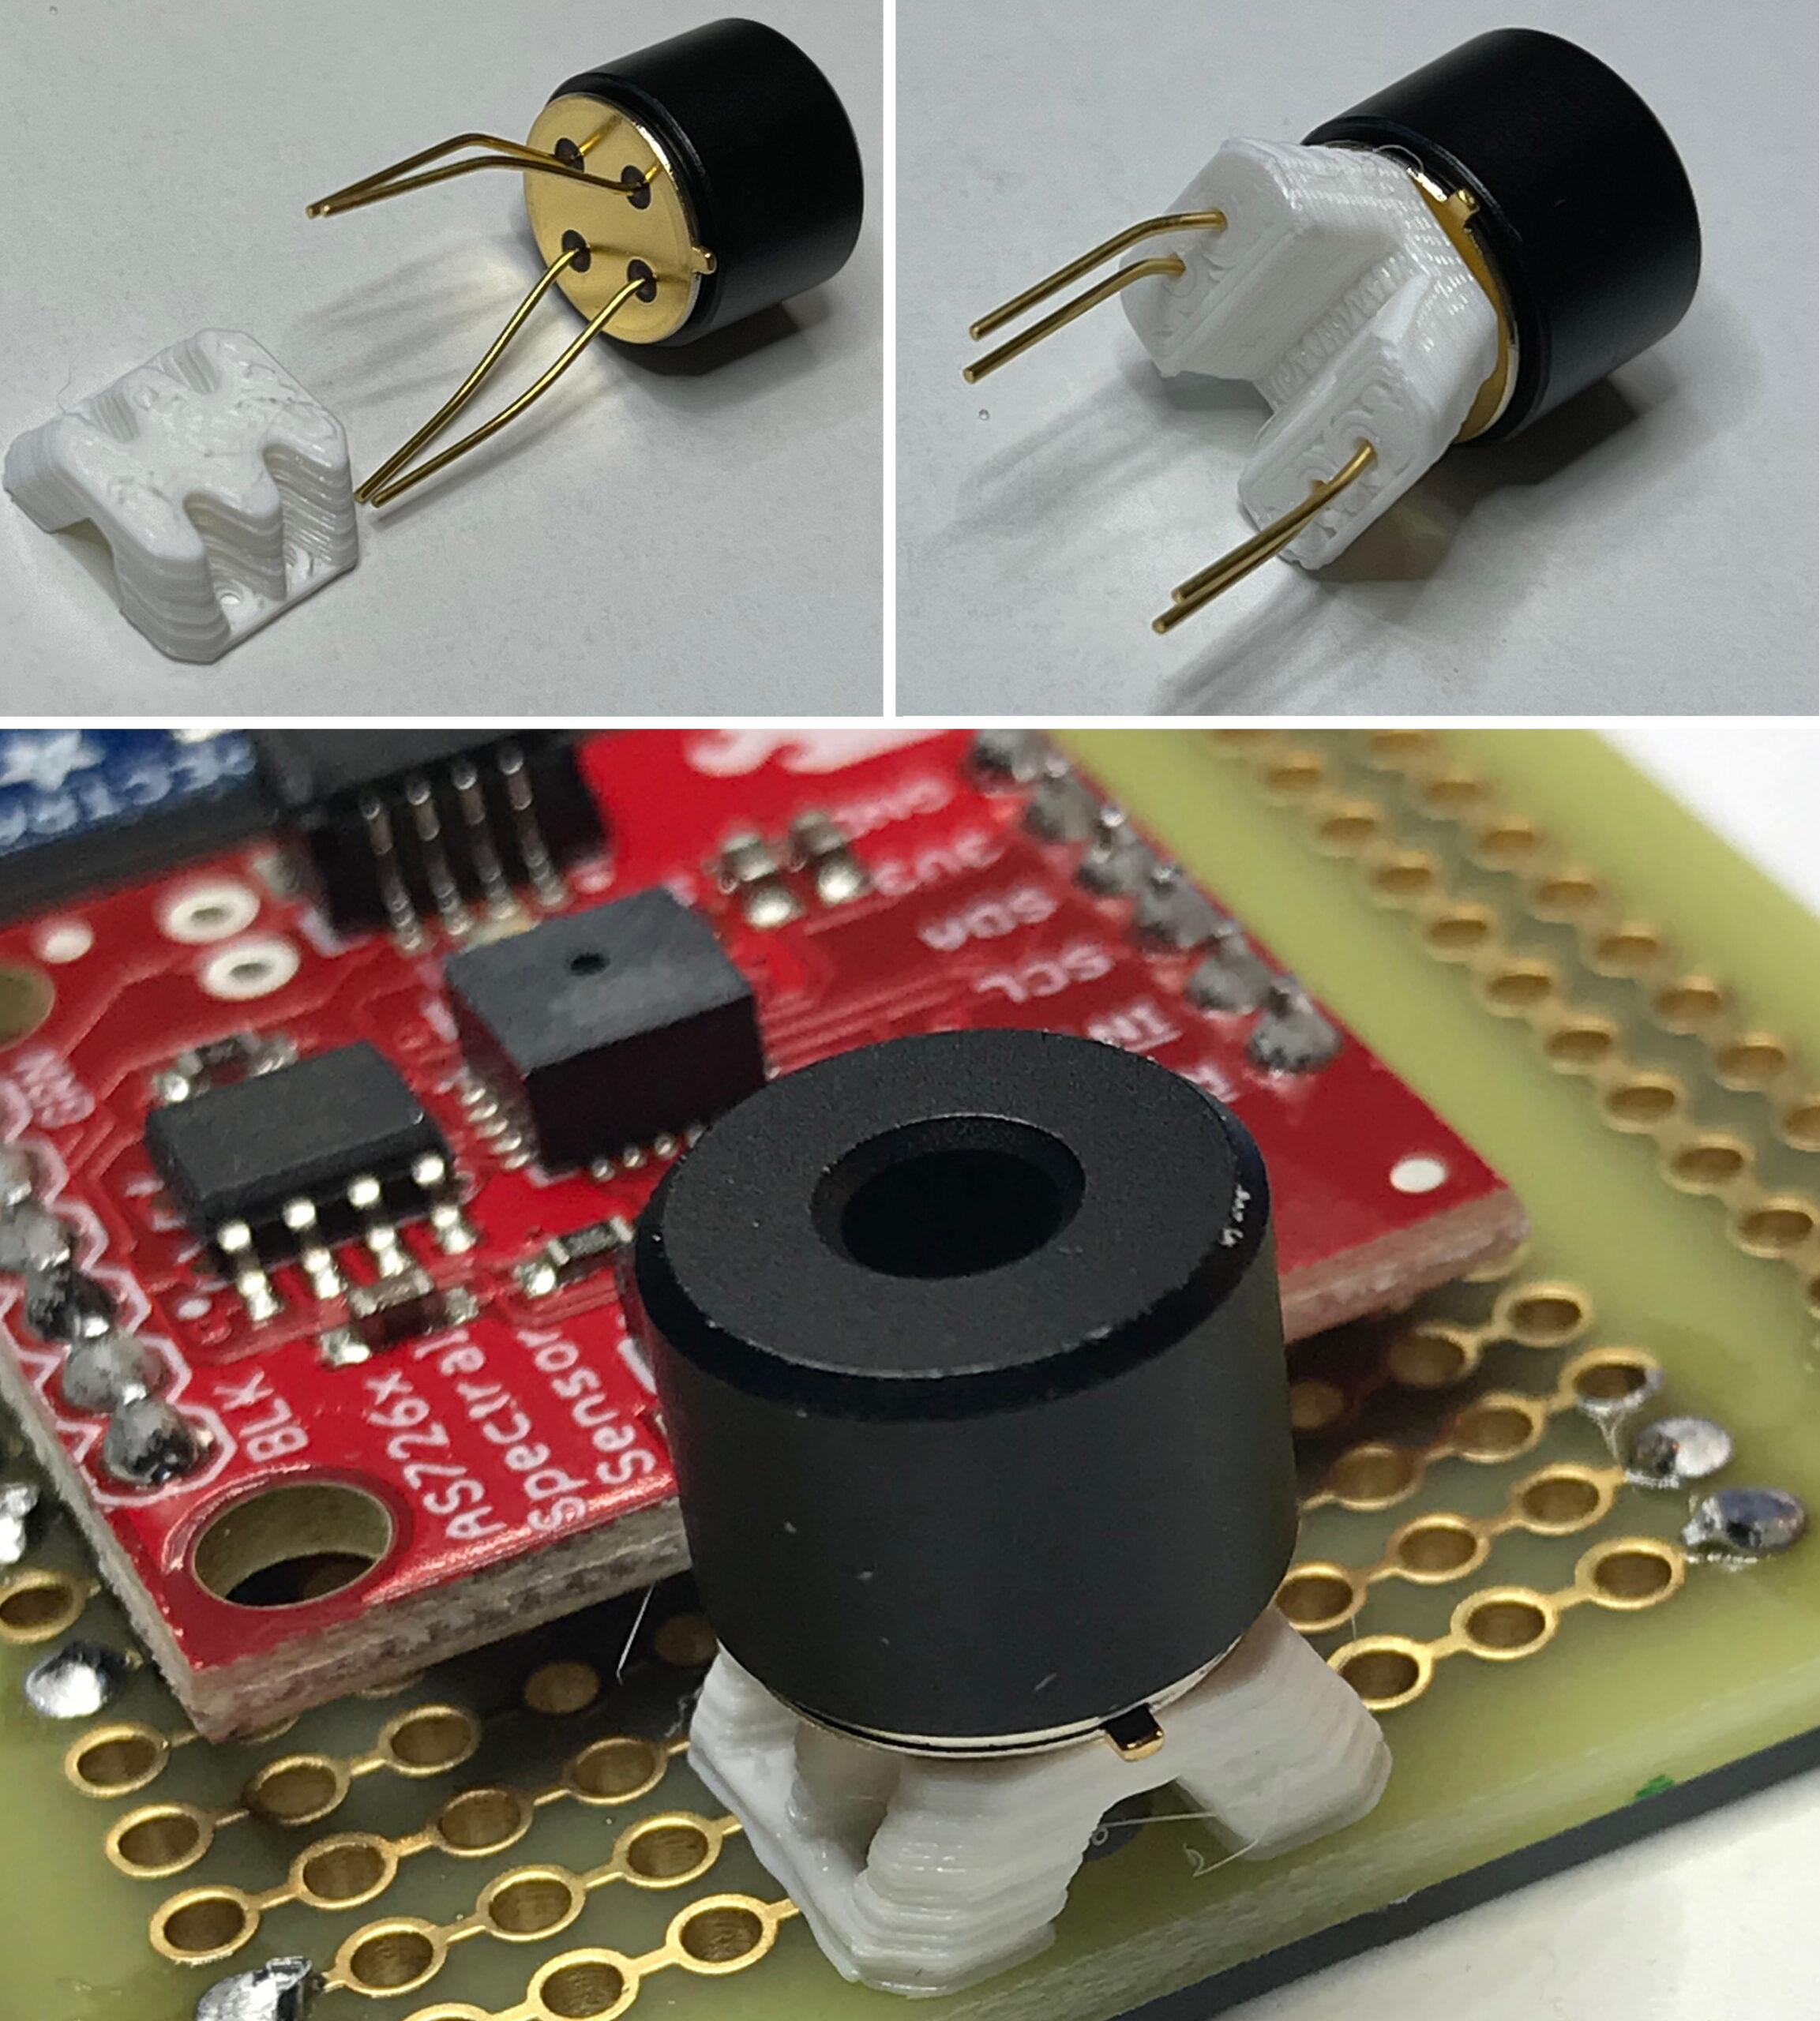
Step 3: Install the Thermal Infrared spectrum sensor
☐ Install the Thermal InfraRed non-contact surface temperature sensor at the end of the board.
☐ Bend the leads to fit into the spacer.
☐ Insert the leads into the holes in the spacer. Push the sensor flat to the spacer, then re-bend the leads to match the holes in the board.
☐ The sensor tab must protrude off one of the flat sides of the spacer. The sensor tab must point off the end of the board.
☐ Solder the leads in pins F1, F2, E1, E2, on the front of the board, then trim off the excess.
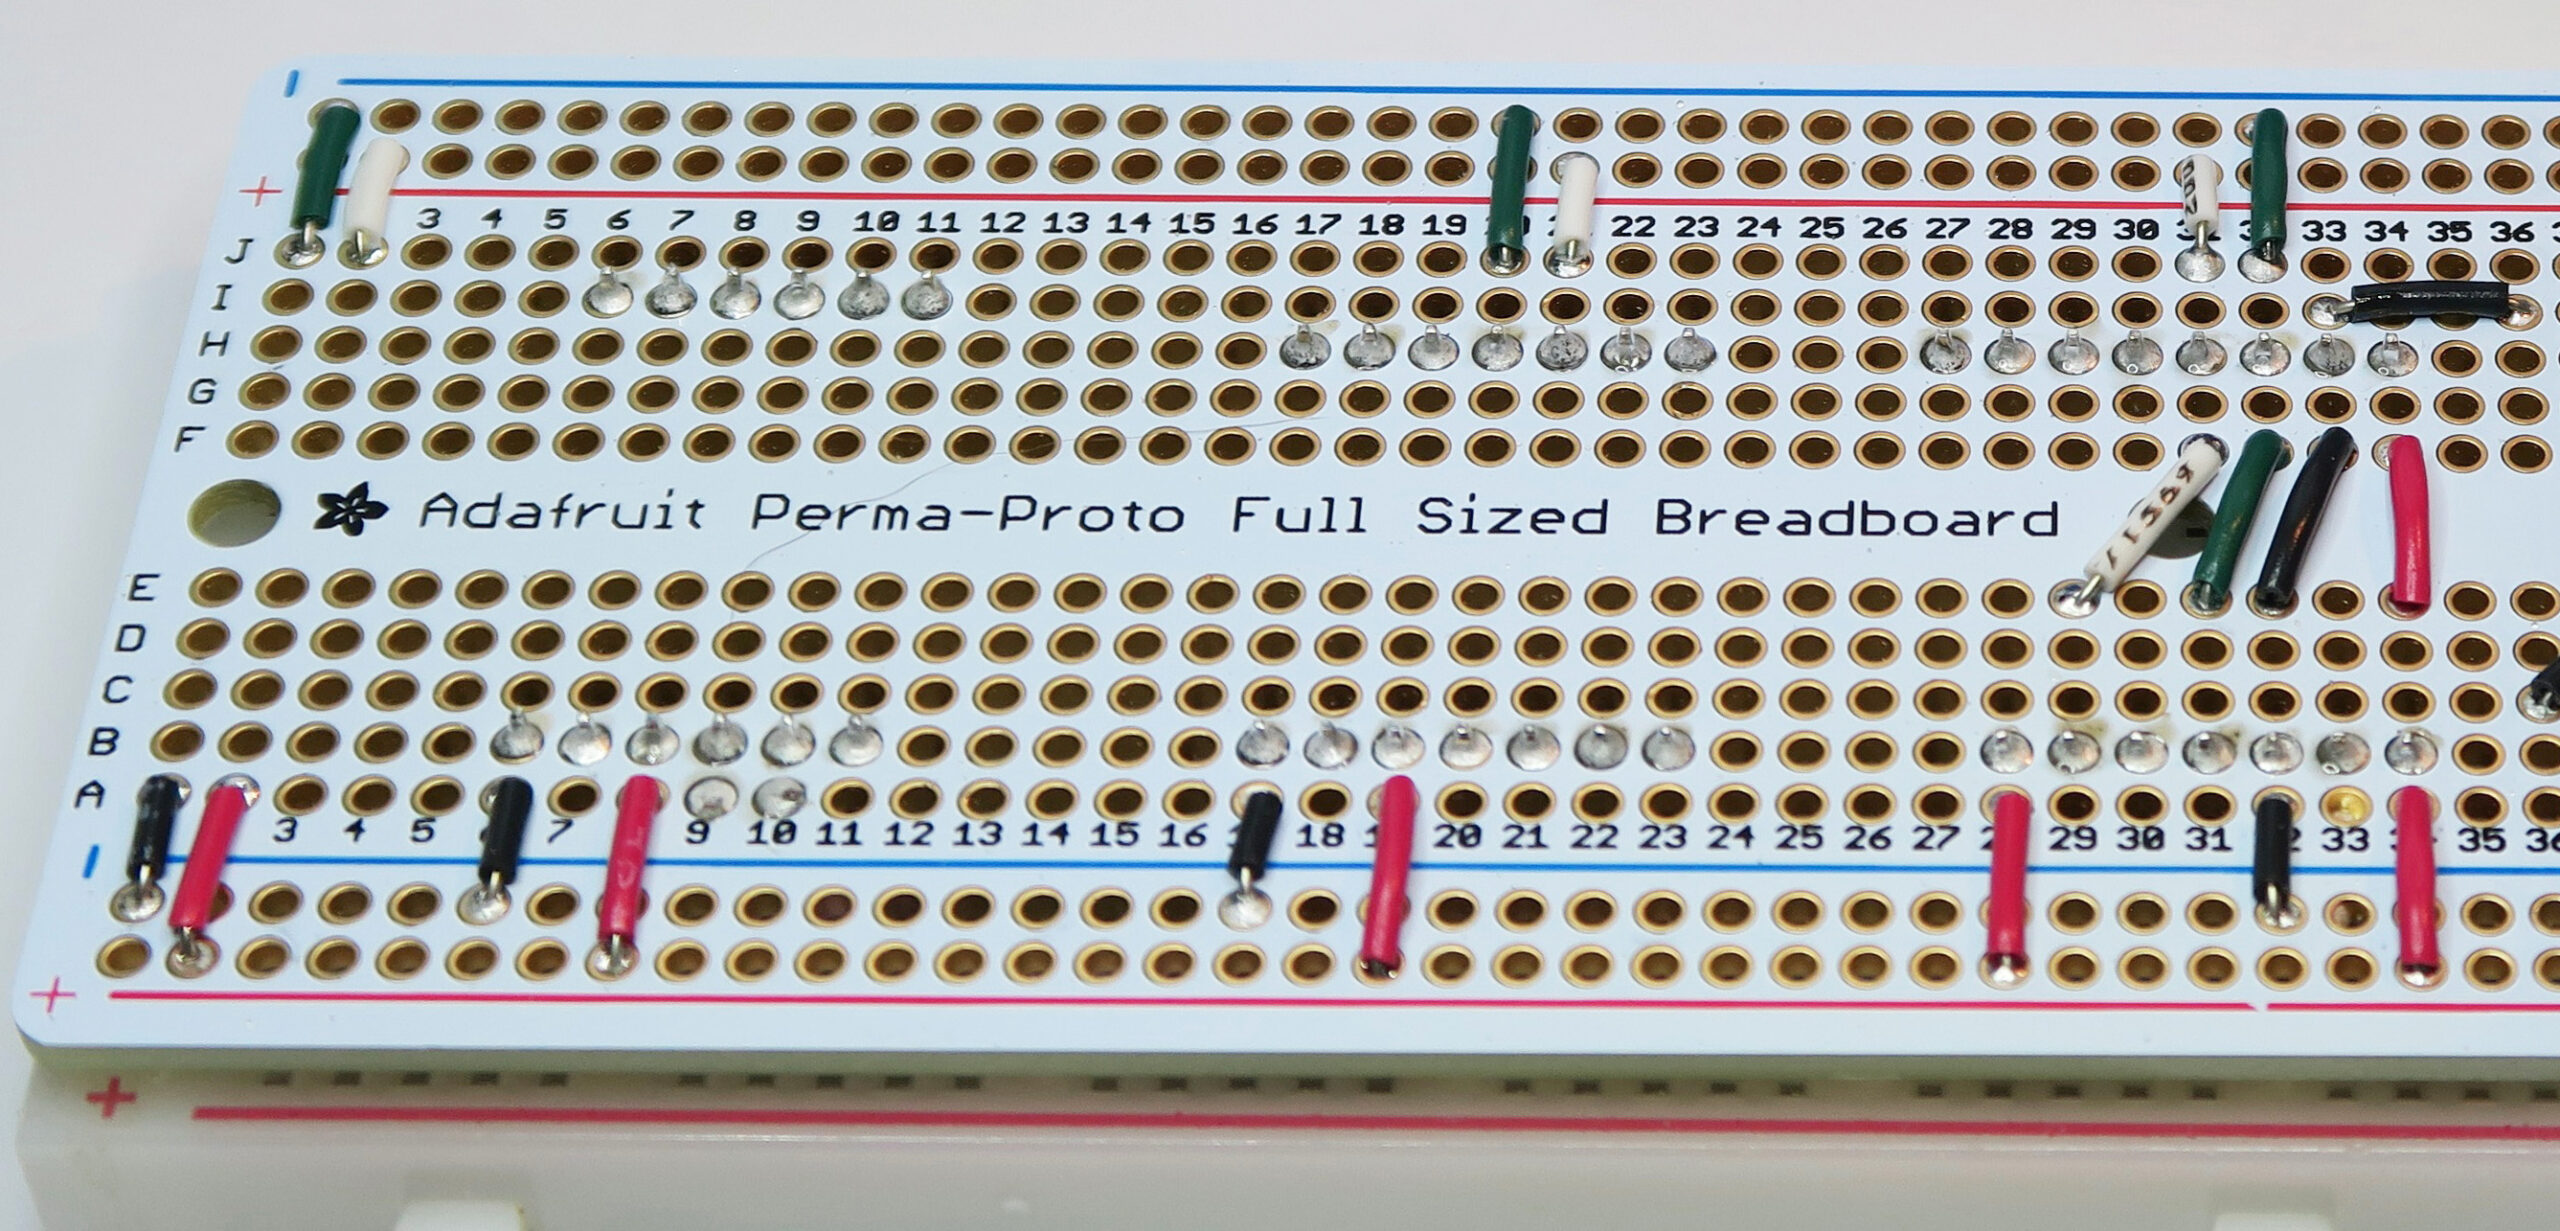
Step 1: Install Discretes Rear
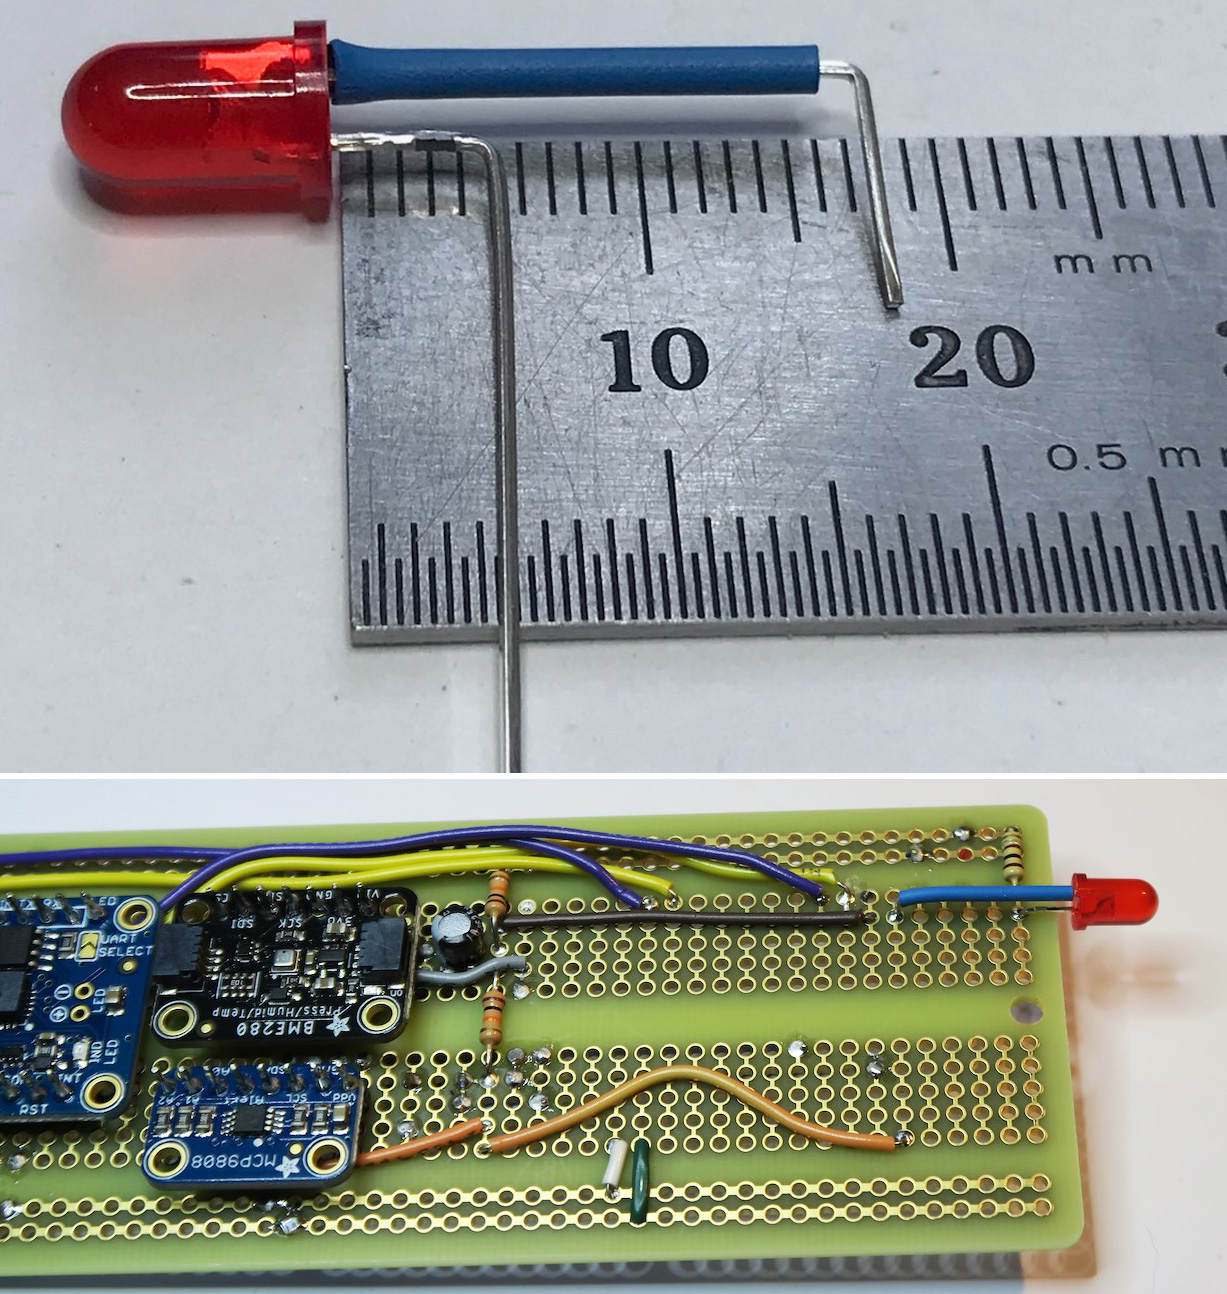
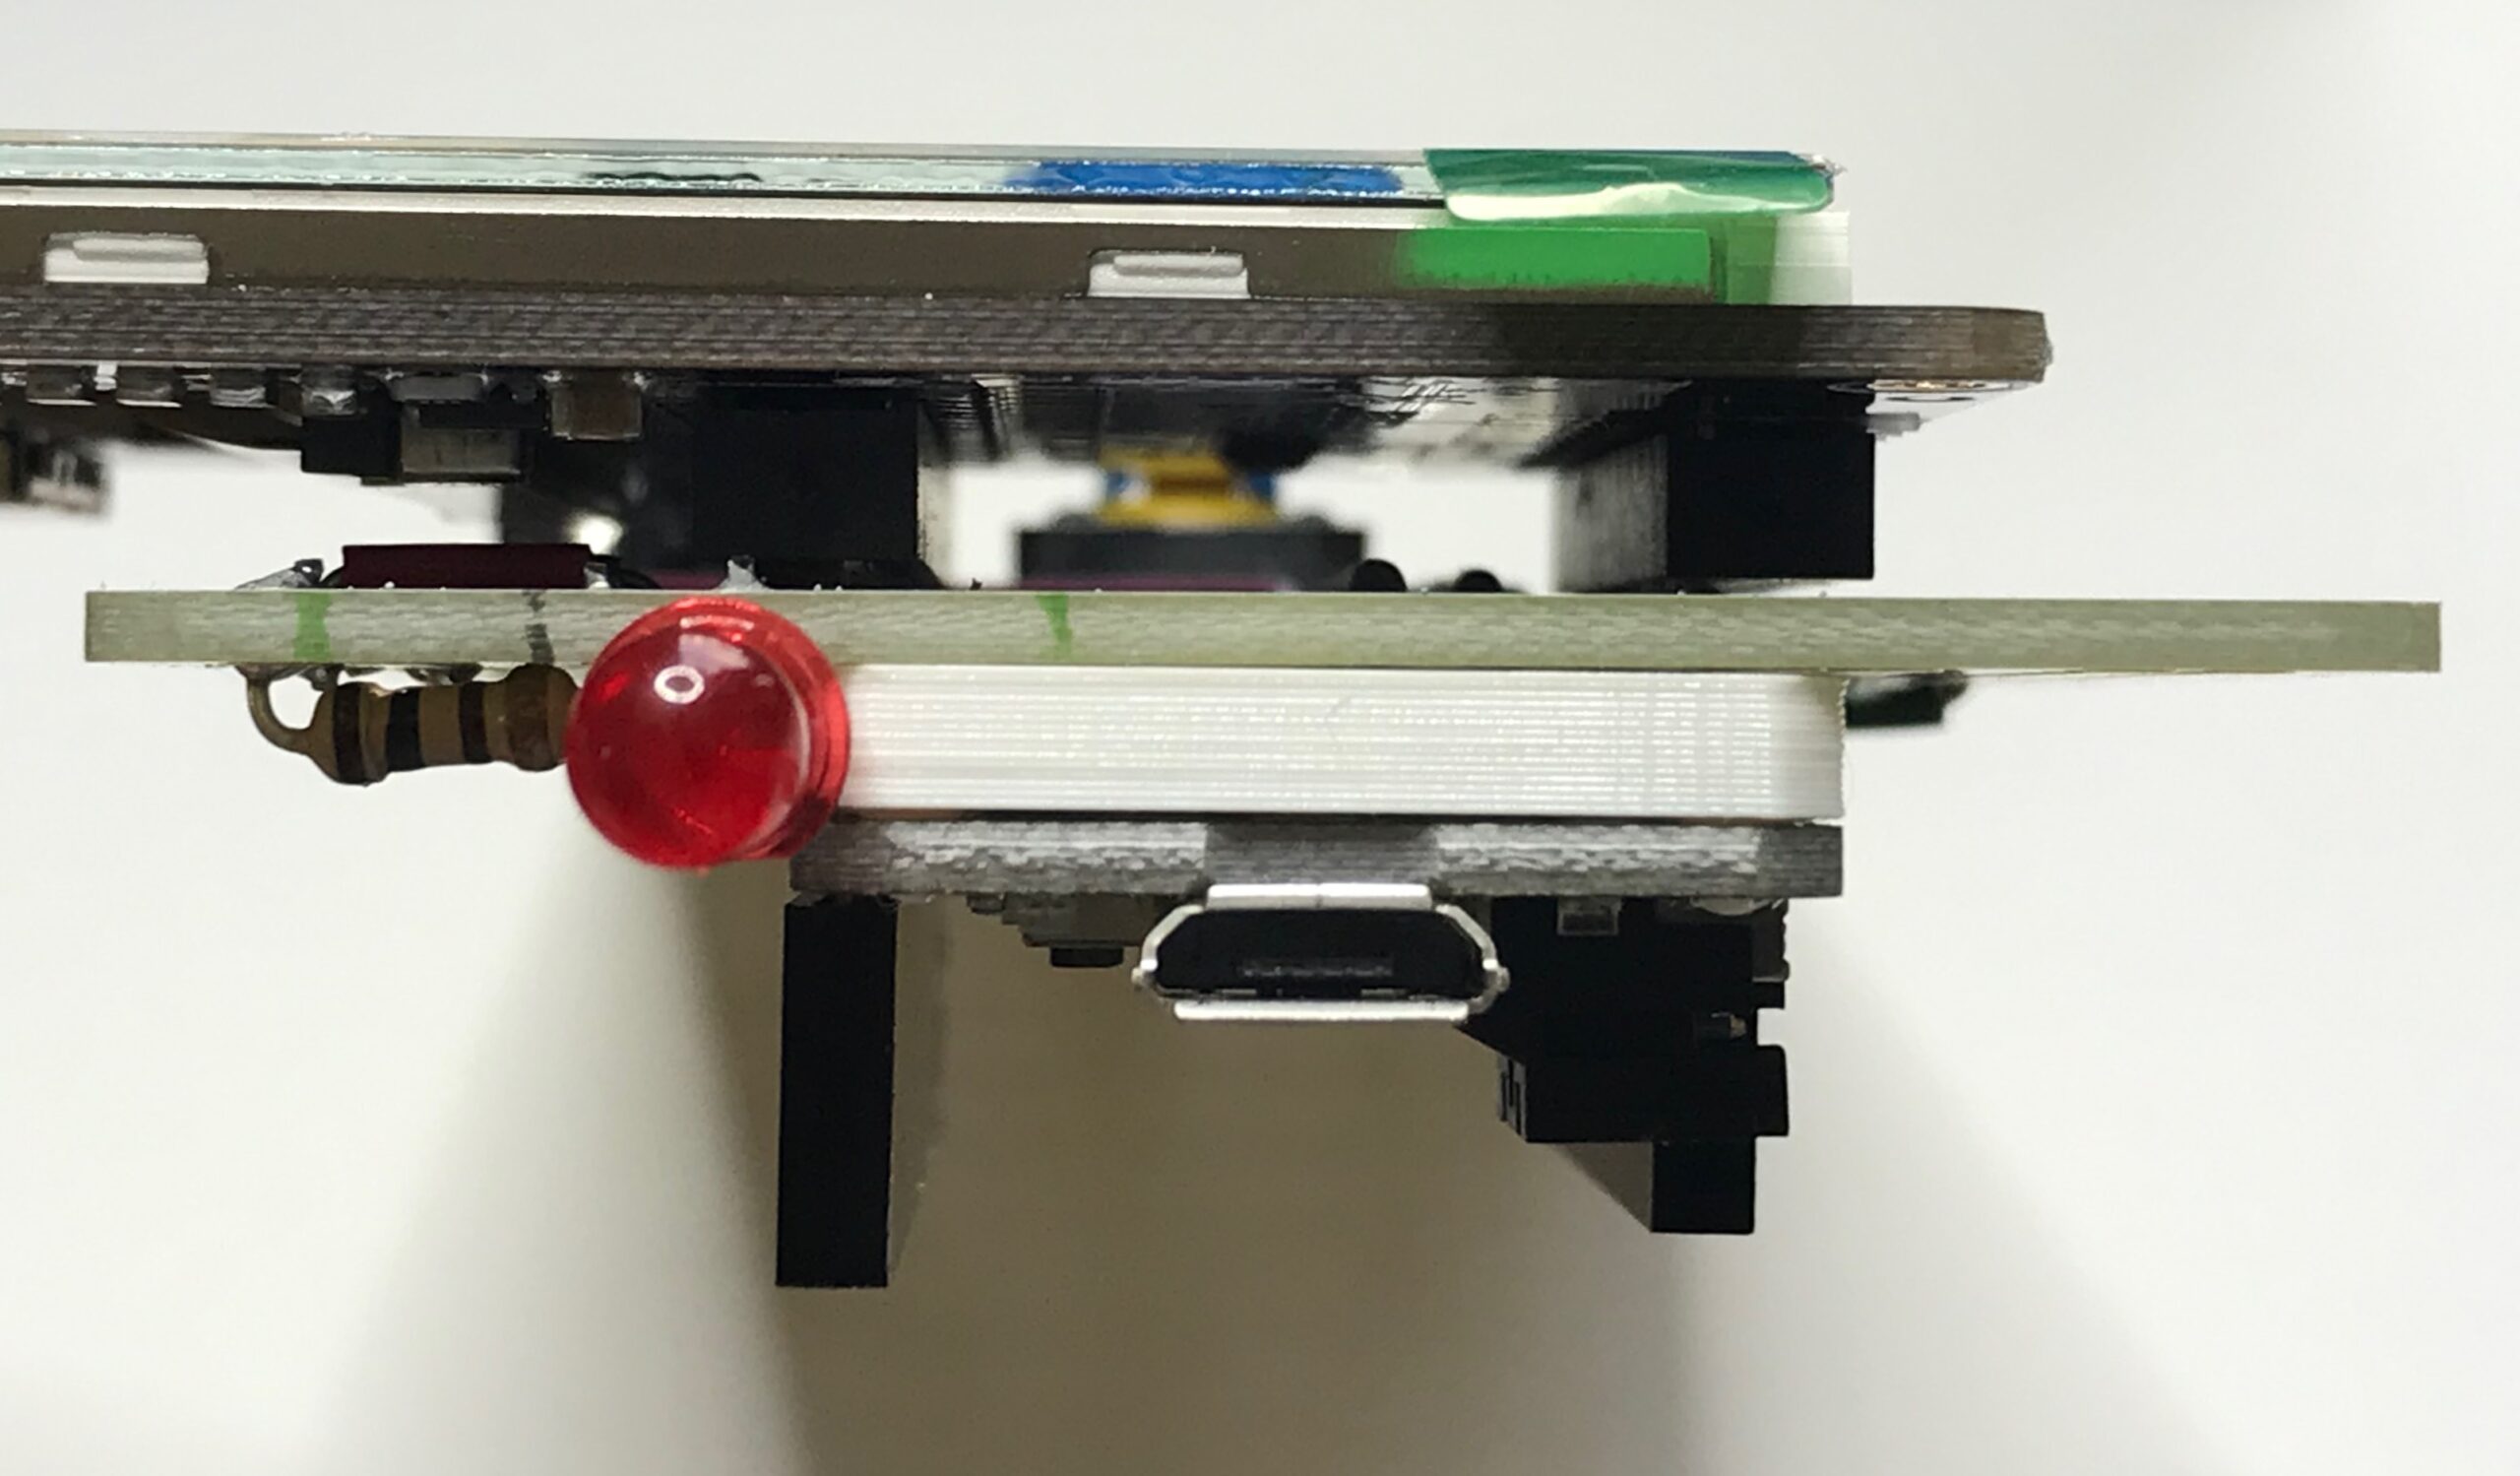
Bend red LED.
☐ Identify the negative lead: locate the flat on the case. That's the negative side.
☐ Bend the positive lead at 5 mm (1/4") from the case
☐ Slip a piece of heat shrink tubing, 15 mm long, on the negative lead.
☐ Bend the negative lead at 18 mm (3/4") from the case.
Back:
Install red LED. Connect two places:
☐ positive lead to B60
☐ negative lead to B55
Solder 10µF capacitor. Install at two points. Be careful to install in correct polarization.
☐ - lead into C37 (white stripe)
☐ + lead into C38
Solder two 10 kΩ resistors. Install at two points each.
☐ (-) bus - B39
☐ D39 - G39
Solder one 100 Ω resistor. Install at two points.
☐ (+) bus - A60
Step 2: Install Discretes Front
Front:
Install pushbutton:
☐ D36, D38, G36, G38
Install powerbutton:
☐ A40, (-)bus
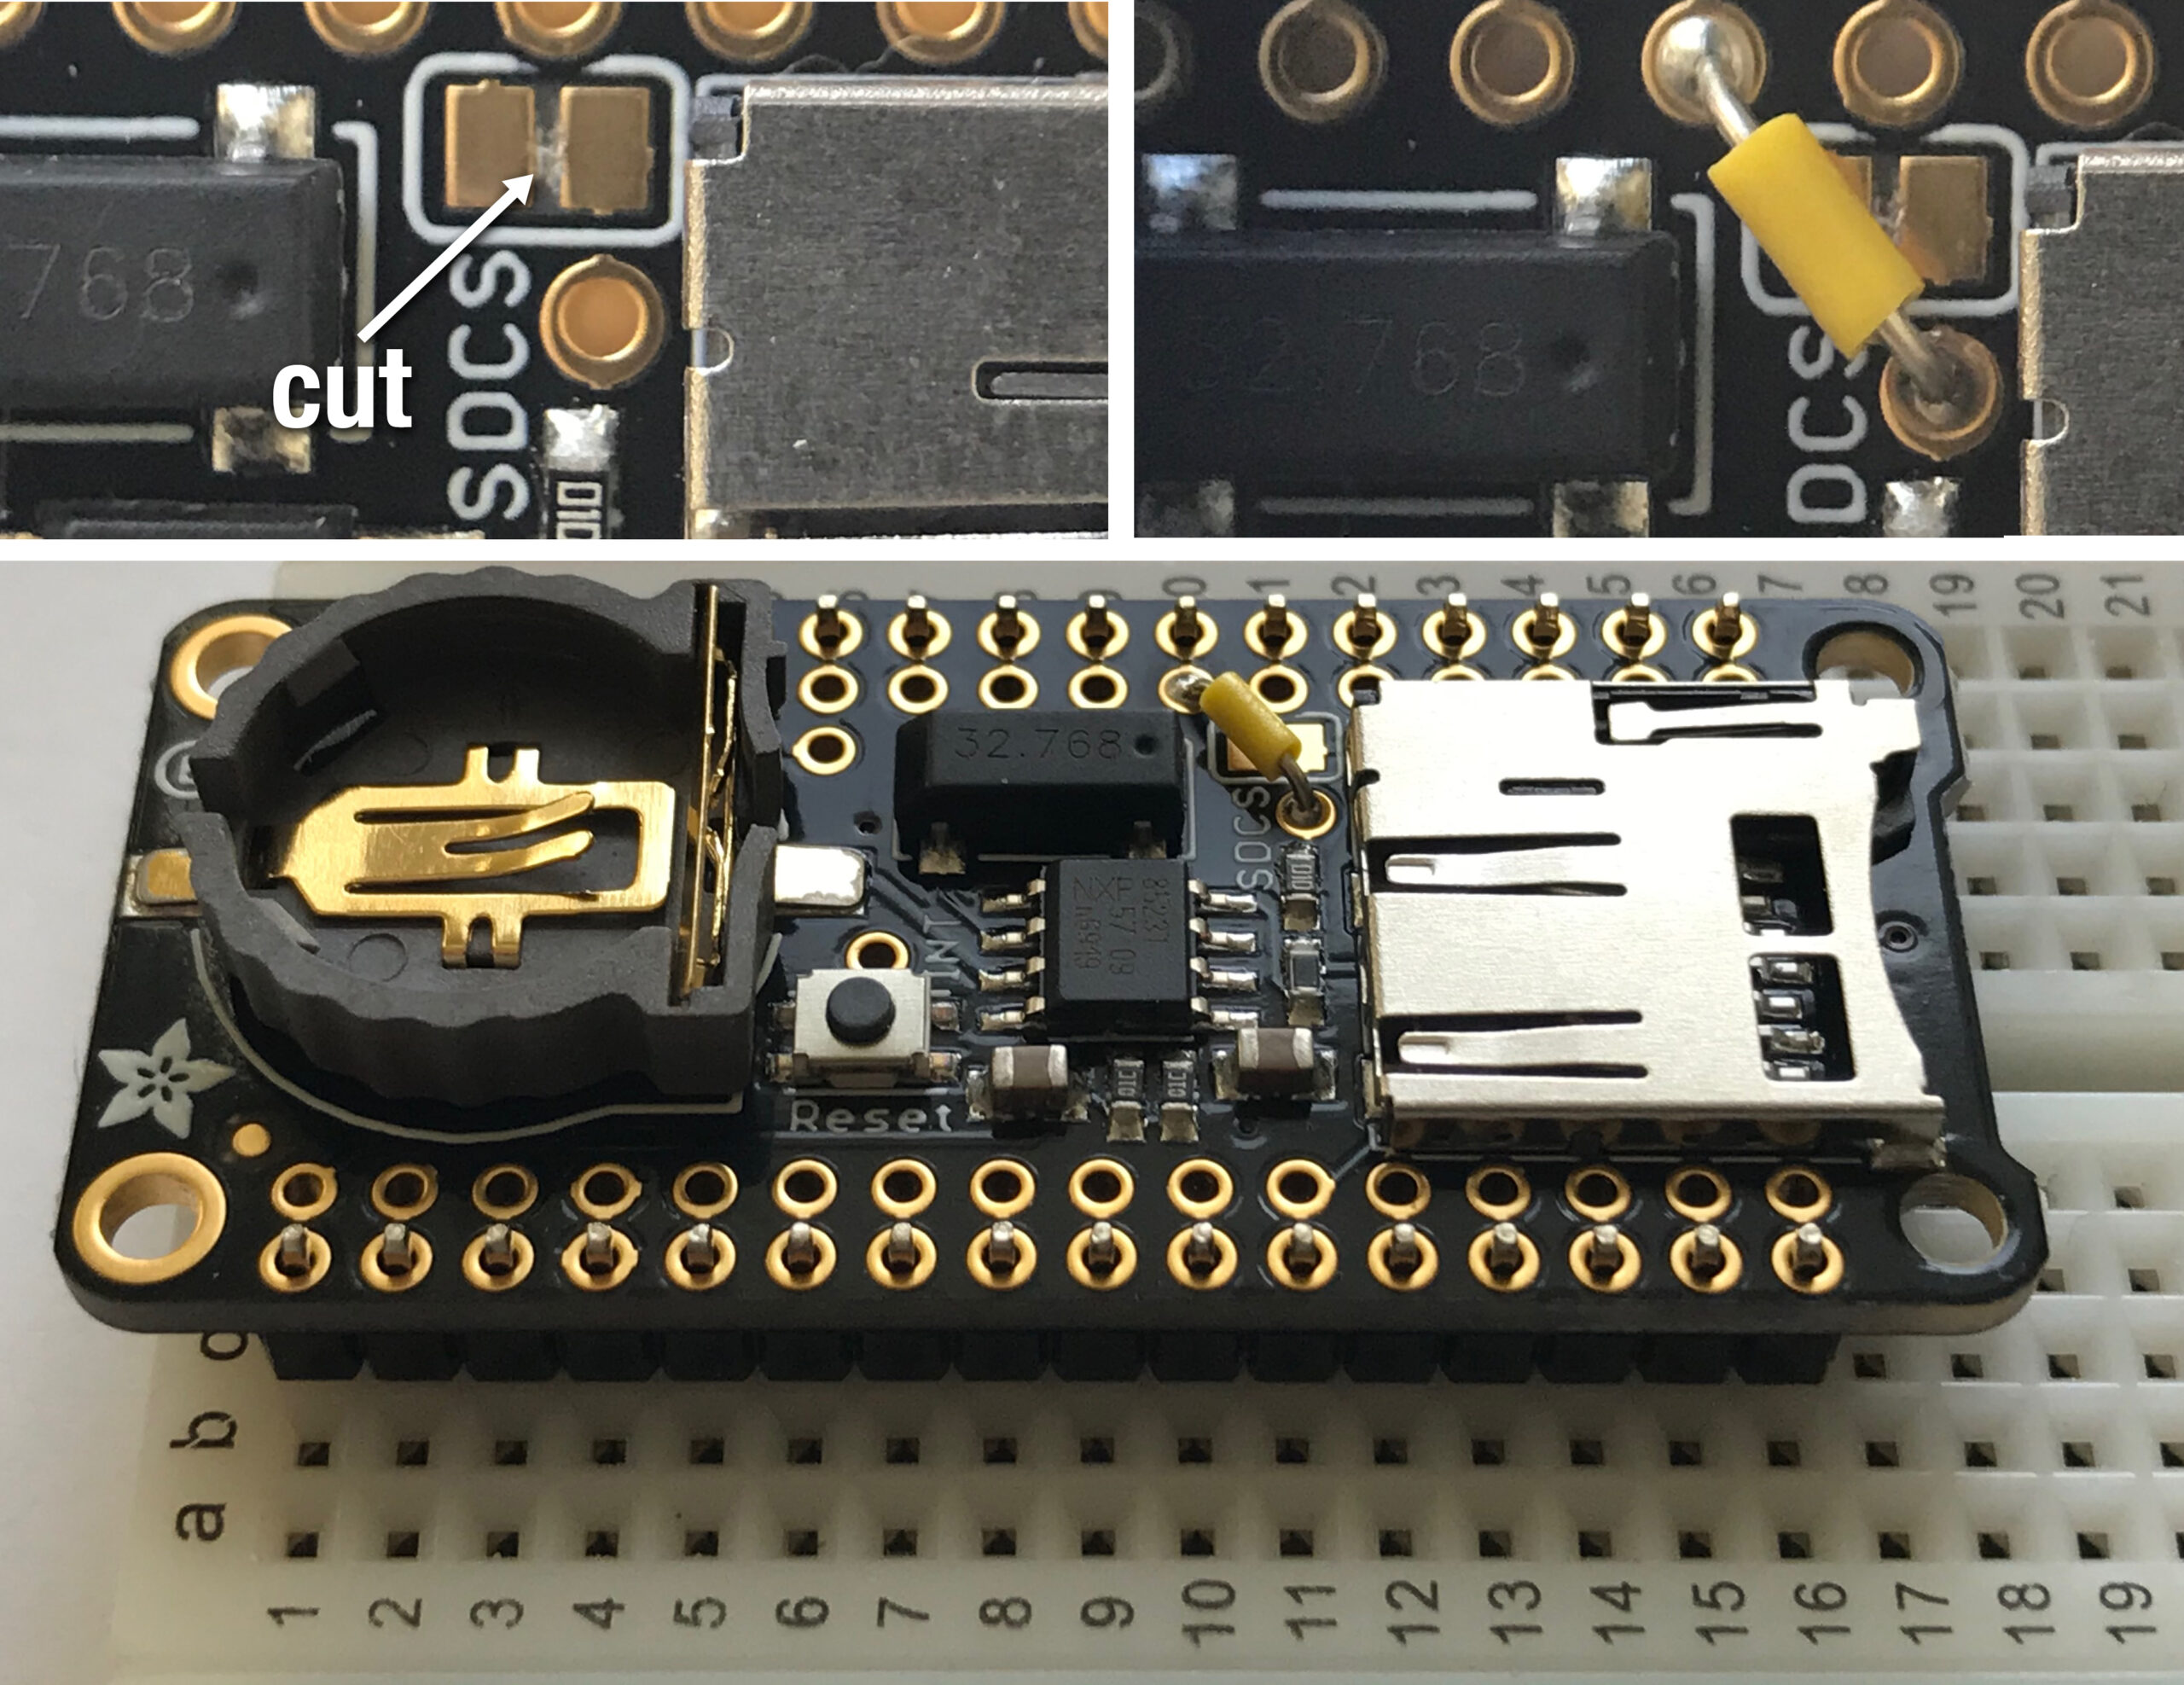
Step 1: Modify and assemble the datalogger board.
☐ Using a hobby knife, cut the circuit trace , marked SDCS, on the front of the board.
☐ Run a new SDCS line to the pin number 11 (yellow wire). Solder.
☐ Push the headers into breadboard, inserting the longer end of the pins into the breadboard. You may want to use something flat to push with to keep the pins from sliding in their plastic holders to different heights.
☐ Place the data logger board on the headers, on top of the breadboard. The pins should protrude through the outer sets of holes.
☐ Solder the header pins to the data logger card, 12 places and 16 places.
☐ Separate the datalogger board from the breadboard.
*SDCS = Secure Digital card Chip Select line, part of SPI (Serial Peripheral Interface) communications
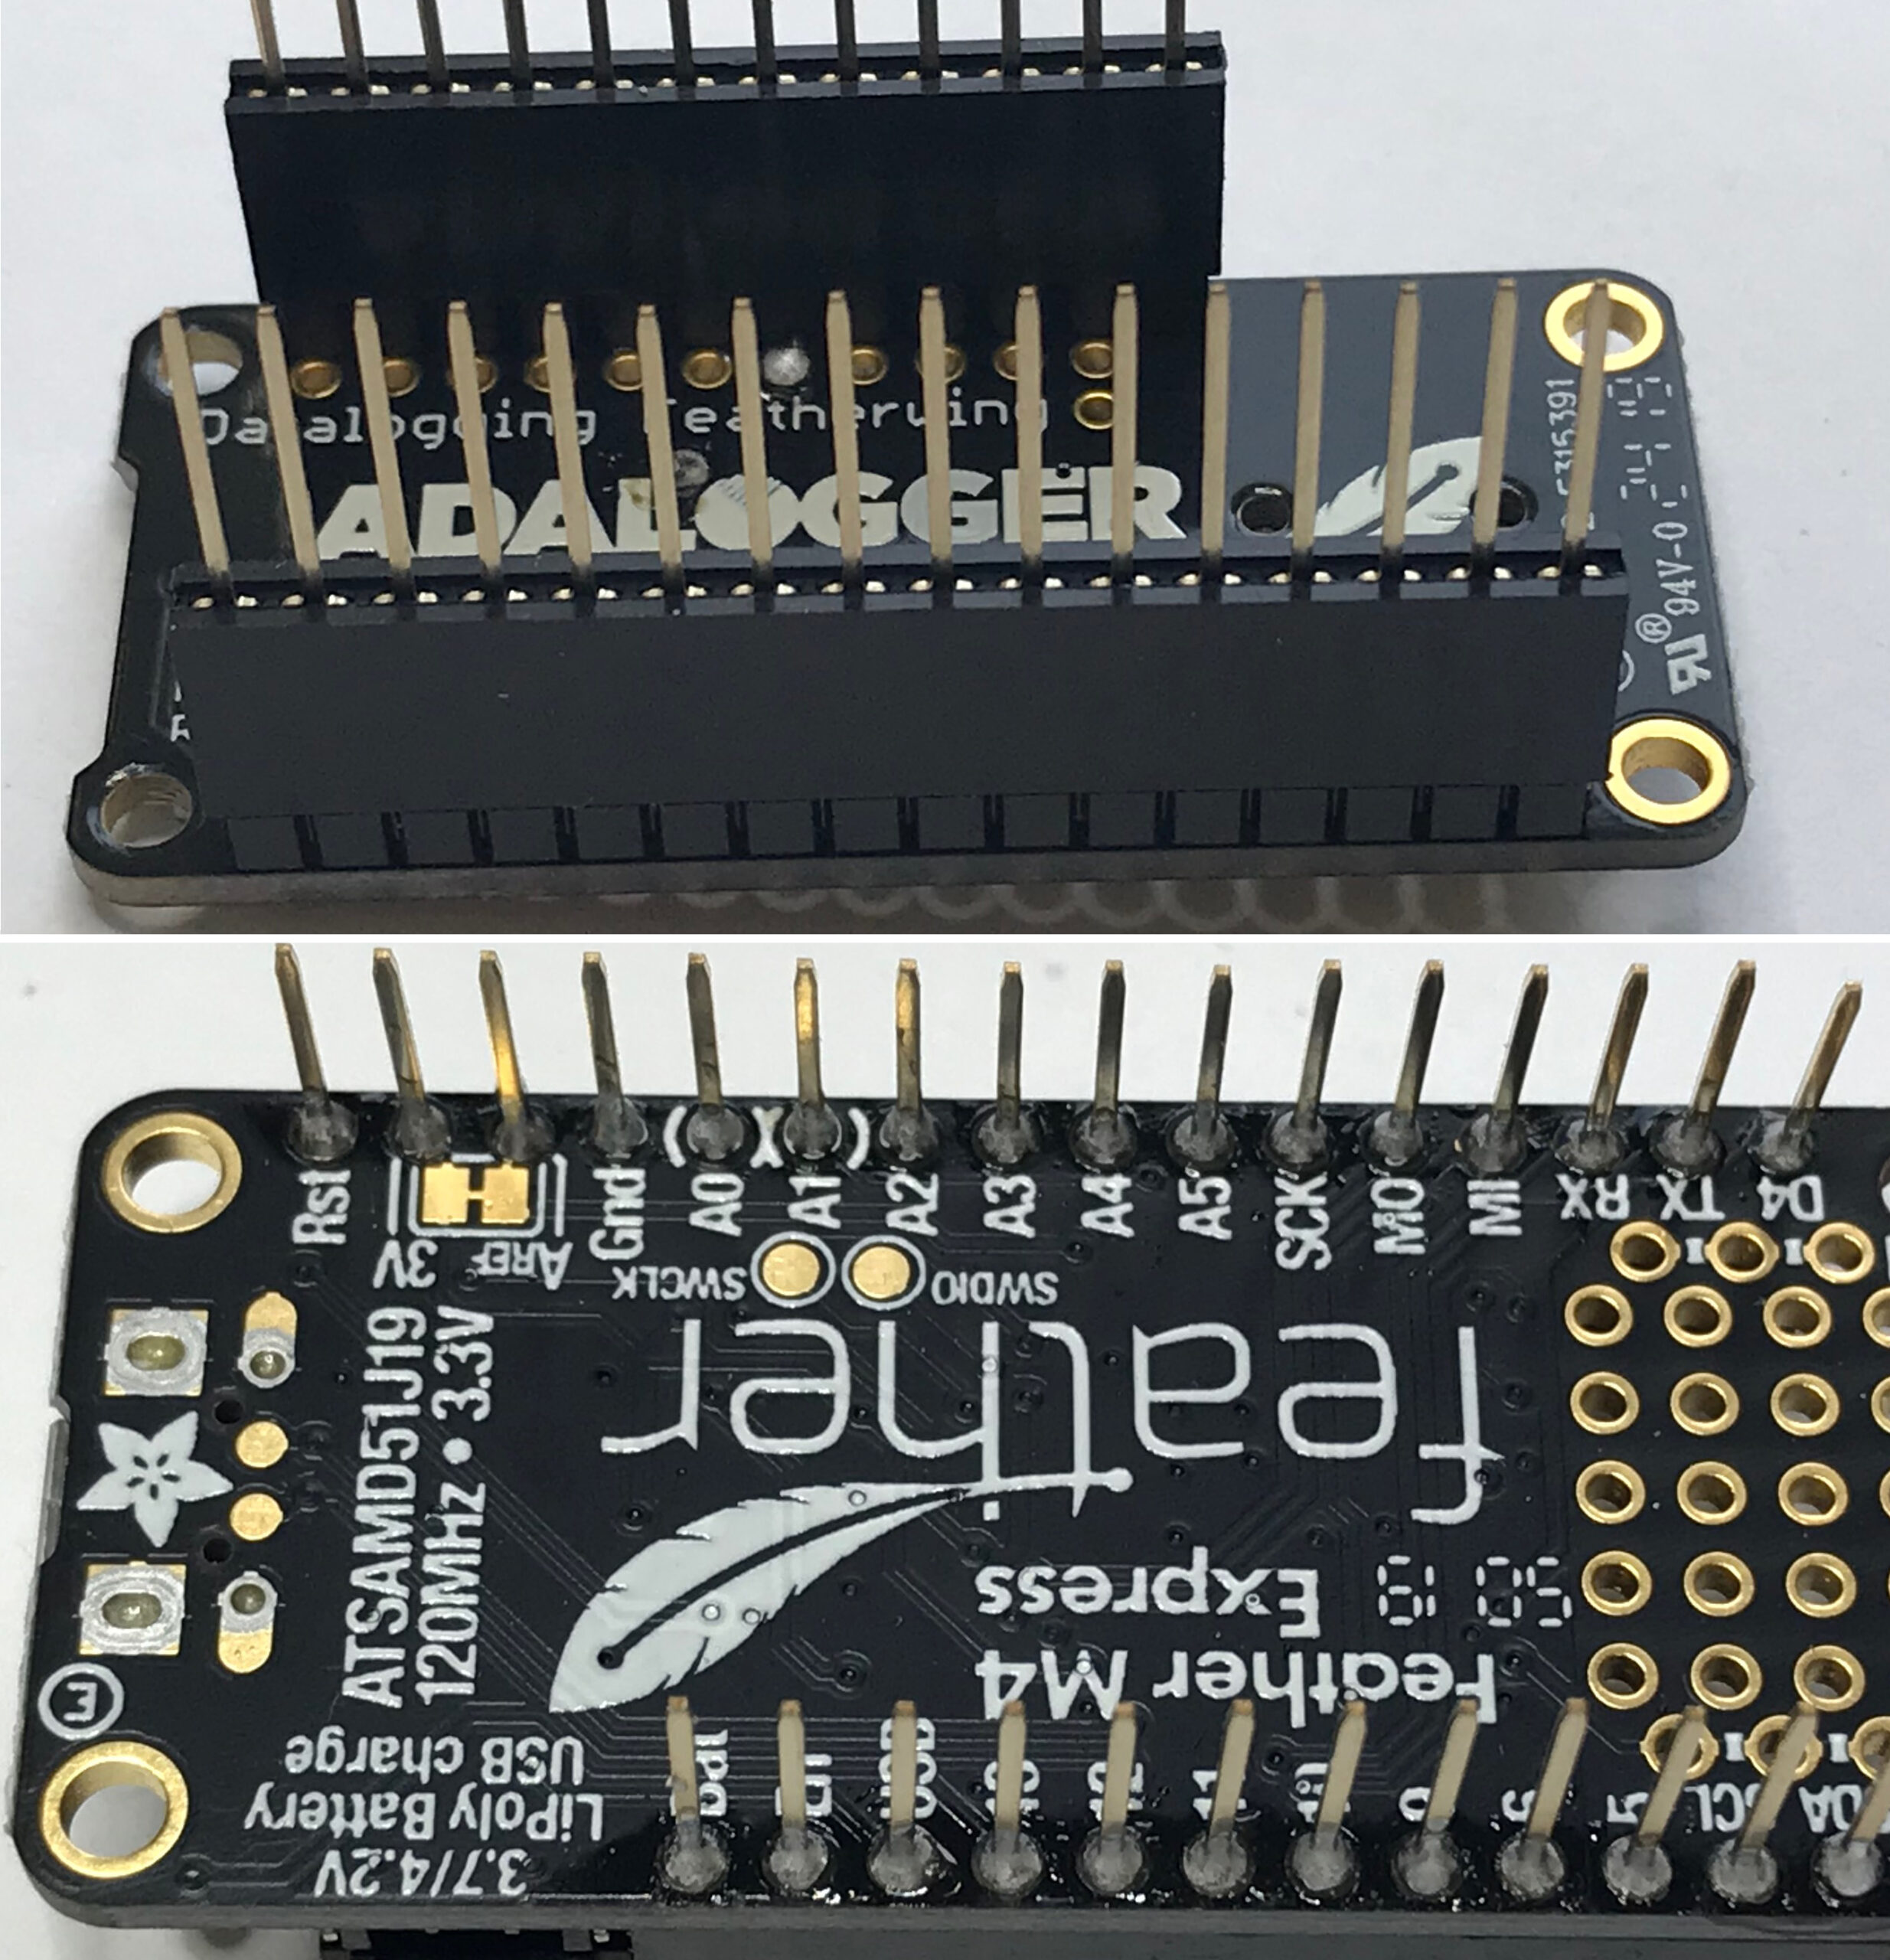
Step 2: Processor
☐ Push a set of stacking headers onto the datalogger card, to use the datalogger as a fixture to keep the headers at right angles to the processor board.
☐ Mount the processor on the headers.
☐ Solder each pin of the headers.
☐ Place the processor spacer on the processor.
☐ Mount the processor to the protoboard, from the back, into C44-59, and I44-55.
☐ Carefully solder the header pins to the protoboard. The exposed pins act as the connection to the display, so it's important to keep the ends of the pins free of solder.
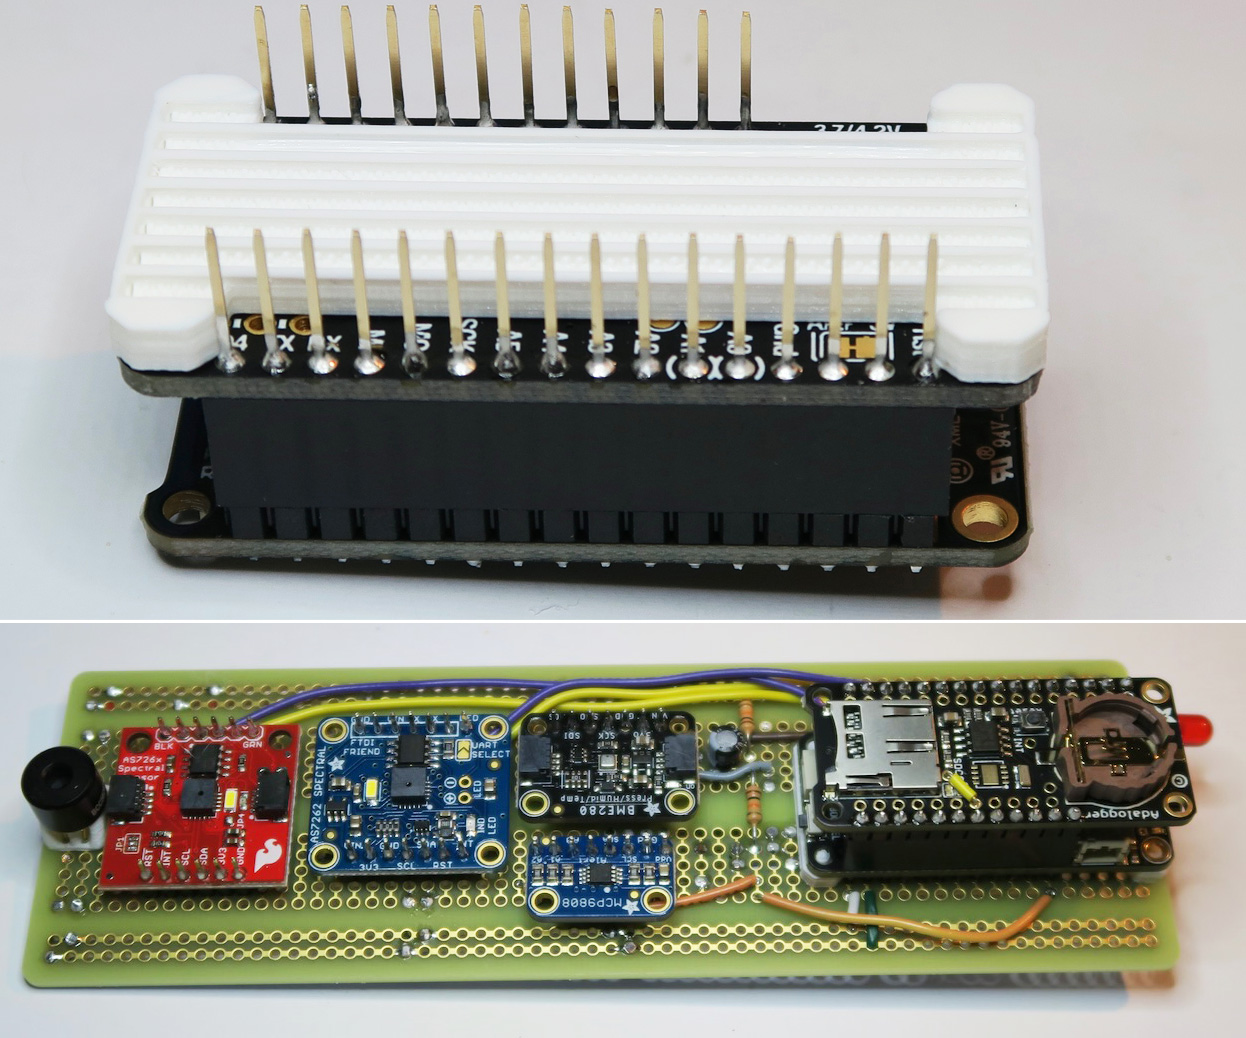
Step 3: Processor placement
☐ Place the processor spacer on the processor.
☐ Mount the processor to the protoboard, from the back, into C44-59, and I44-55.
☐ Carefully solder the header pins to the protoboard. The exposed pins act as the connection to the display, so it's important to keep the ends of the pins FREE of solder. Do not trim pins.
Step 1: 3 Pin Connector
Back:
☐ J36, J37, J38 (slot towards center of protoboard)
Step 2: Connectors
Trim segments of short header to make four pieces at 3 pins each. The four short headers on the front of the board provide connections for a future board to expand the functionality of the STELLA instrument. Use header pin segments in the breadboard fixture to help place the short headers. Place the board on the fixture carefully to align the headers with their correct locations, then solder them in place.
Front:
☐ A24, A25, A26
☐ J24, J25, J26
☐ J3, J4, J5
☐ (-) bus (near A3, A4, A5)
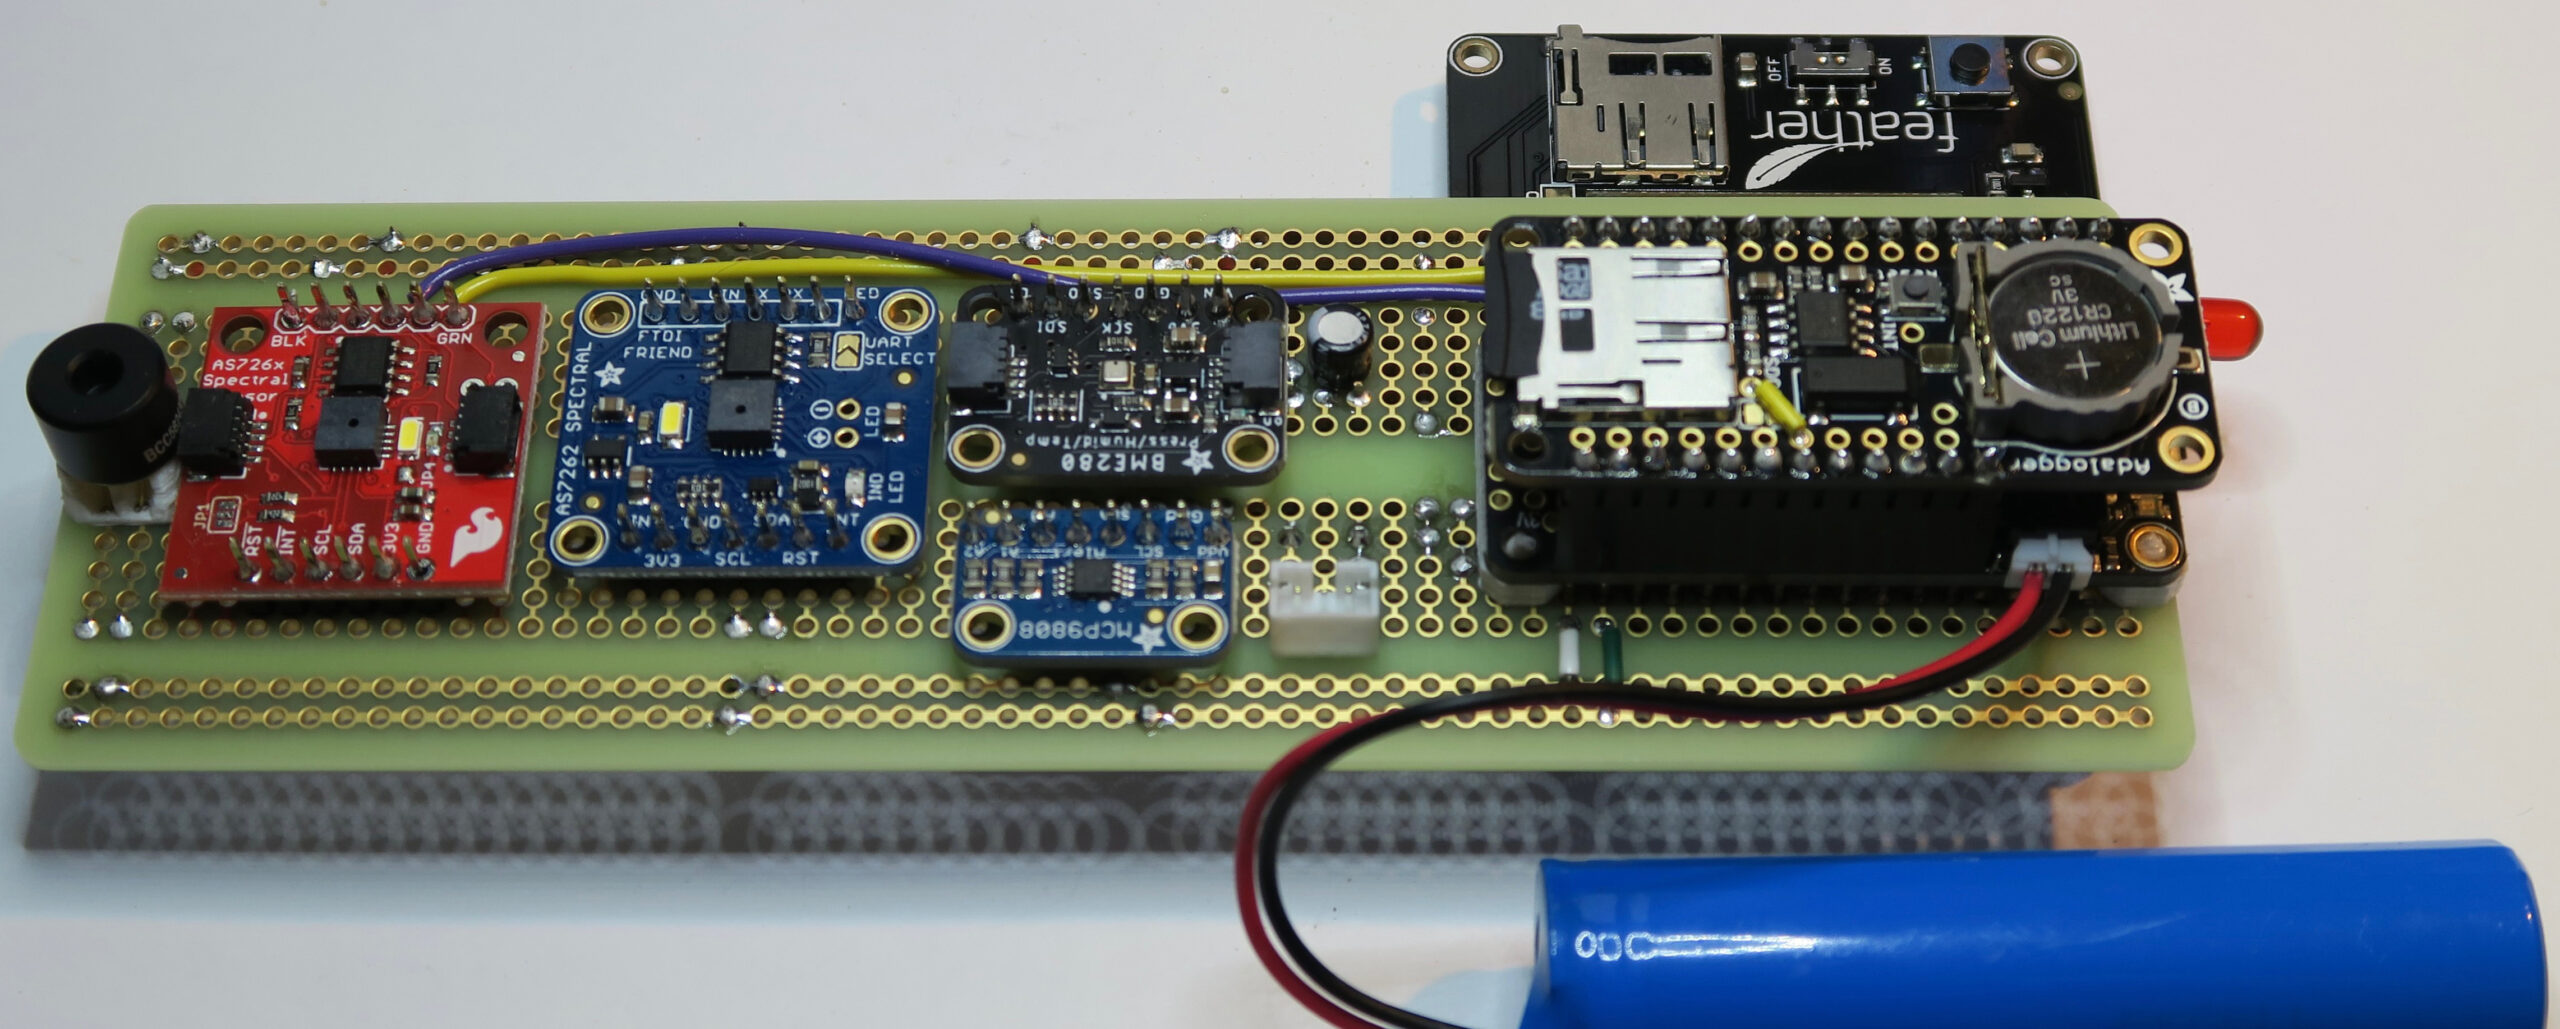
Step 1: Install back components
☐ Datalogger card -- mount the data logger card onto the processor by carefully aligning all the pins and pressing until it seats on the processor.
☐ Clock battery -- Clean the battery surface with isopropanol and a paper wipe (paper towel, toilet paper, lens cleaning tissue) before installing it, to help keep the battery in good contact with the clock module. Drop the battery into the grey holder, starting with the side away from the gold retaining spring. Then press the battery down flat, until the retaining spring clicks onto the top of the battery to hold it in place.
☐ microSD memory card -- Press the microSD card into the connection slot. Press to seat it. Press a bit more to unlatch it, when you want to remove it.
Step 2: Install front components
☐ Display -- Very carefully position the display so that the socket connectors on the display line up with the processor pins sticking up off the main board. There are two sets of sockets on the display. The pins should connect to the innermost set on both sides of the display. Press gently on the display to seat it onto the pins.
☐ Main battery -- Plug the connector on the main battery into the battery socket on the processor.
Whether the power button is on or off, the battery can be charged by connecting the instrument, at its micro b connector, to a USB power source.
Do not attempt to charge the battery by other methods, as doing so may risk damage to the battery and/or a battery fire.
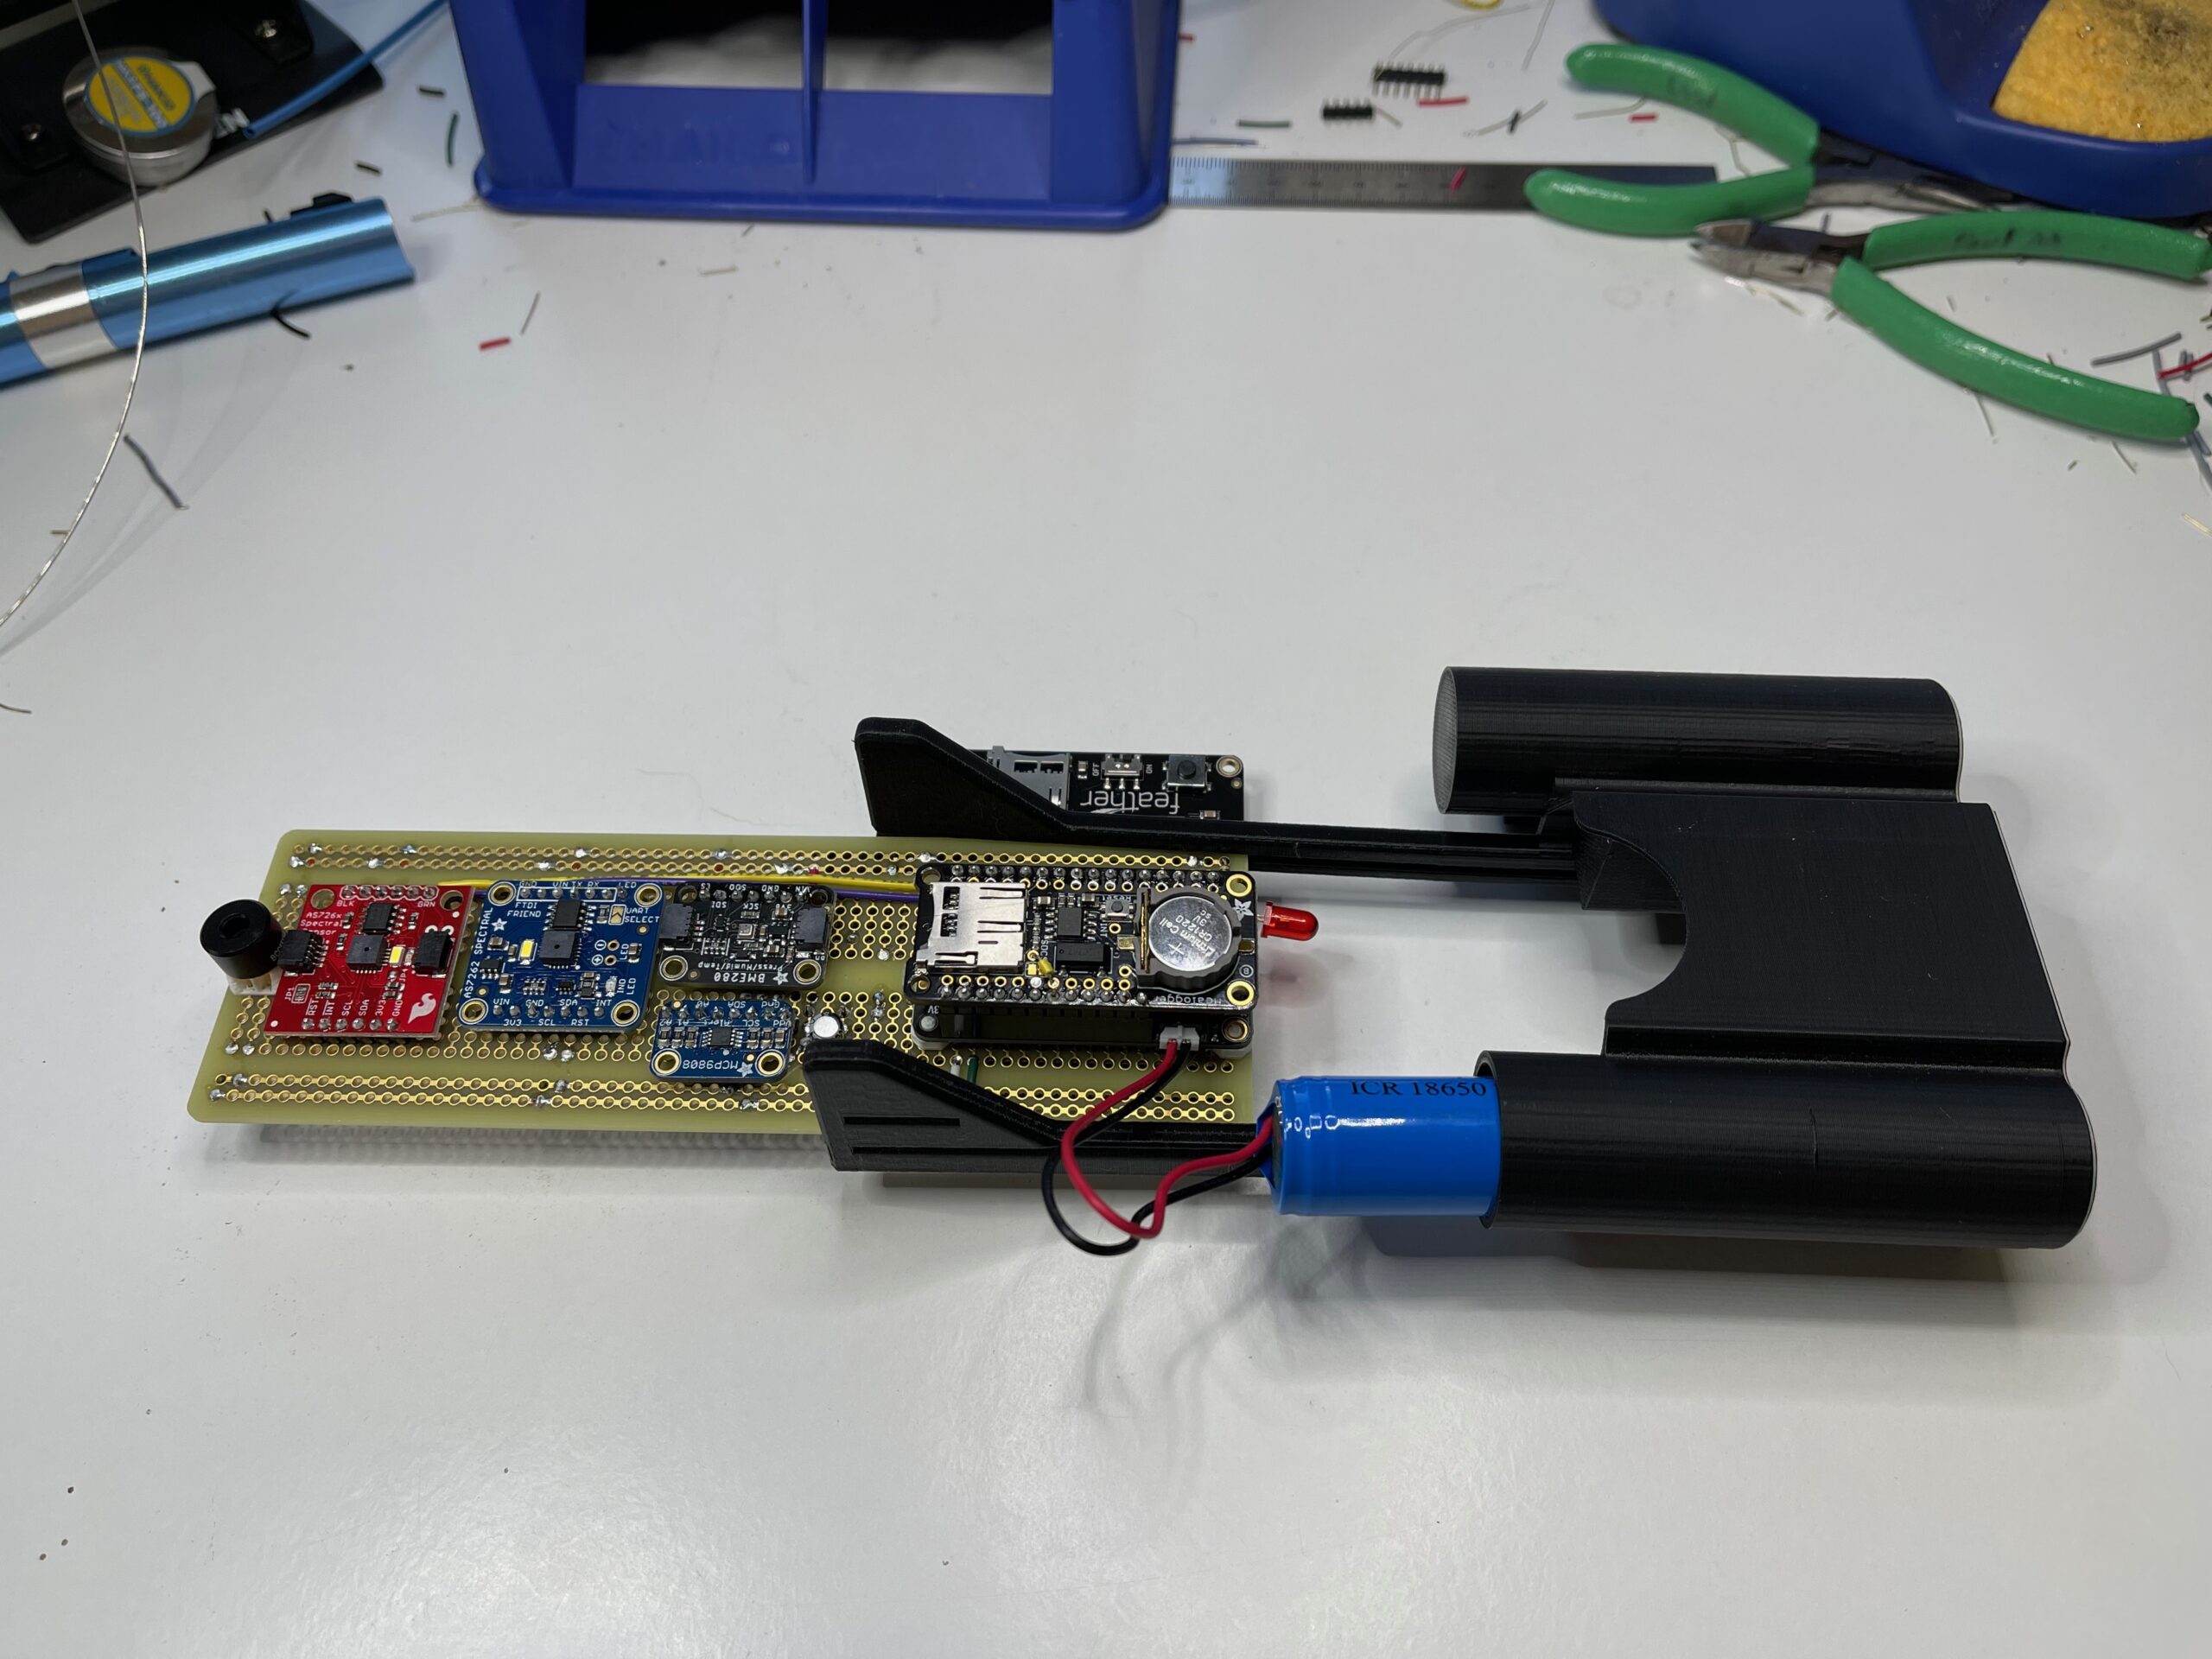
Step 3: Lower Housing Assembly
☐ Slide the protoboard into the board edge guide slots on the lower housing.
☐ Lower the battery into the cylindrical recess, as you slide the board all the way into the housing. You may need to press on the display on one side or another to get it to sit flat, so it will fit into the housing.
☐ Check that the LED is aligned with the hole, then slide the instrument into the housing completely.
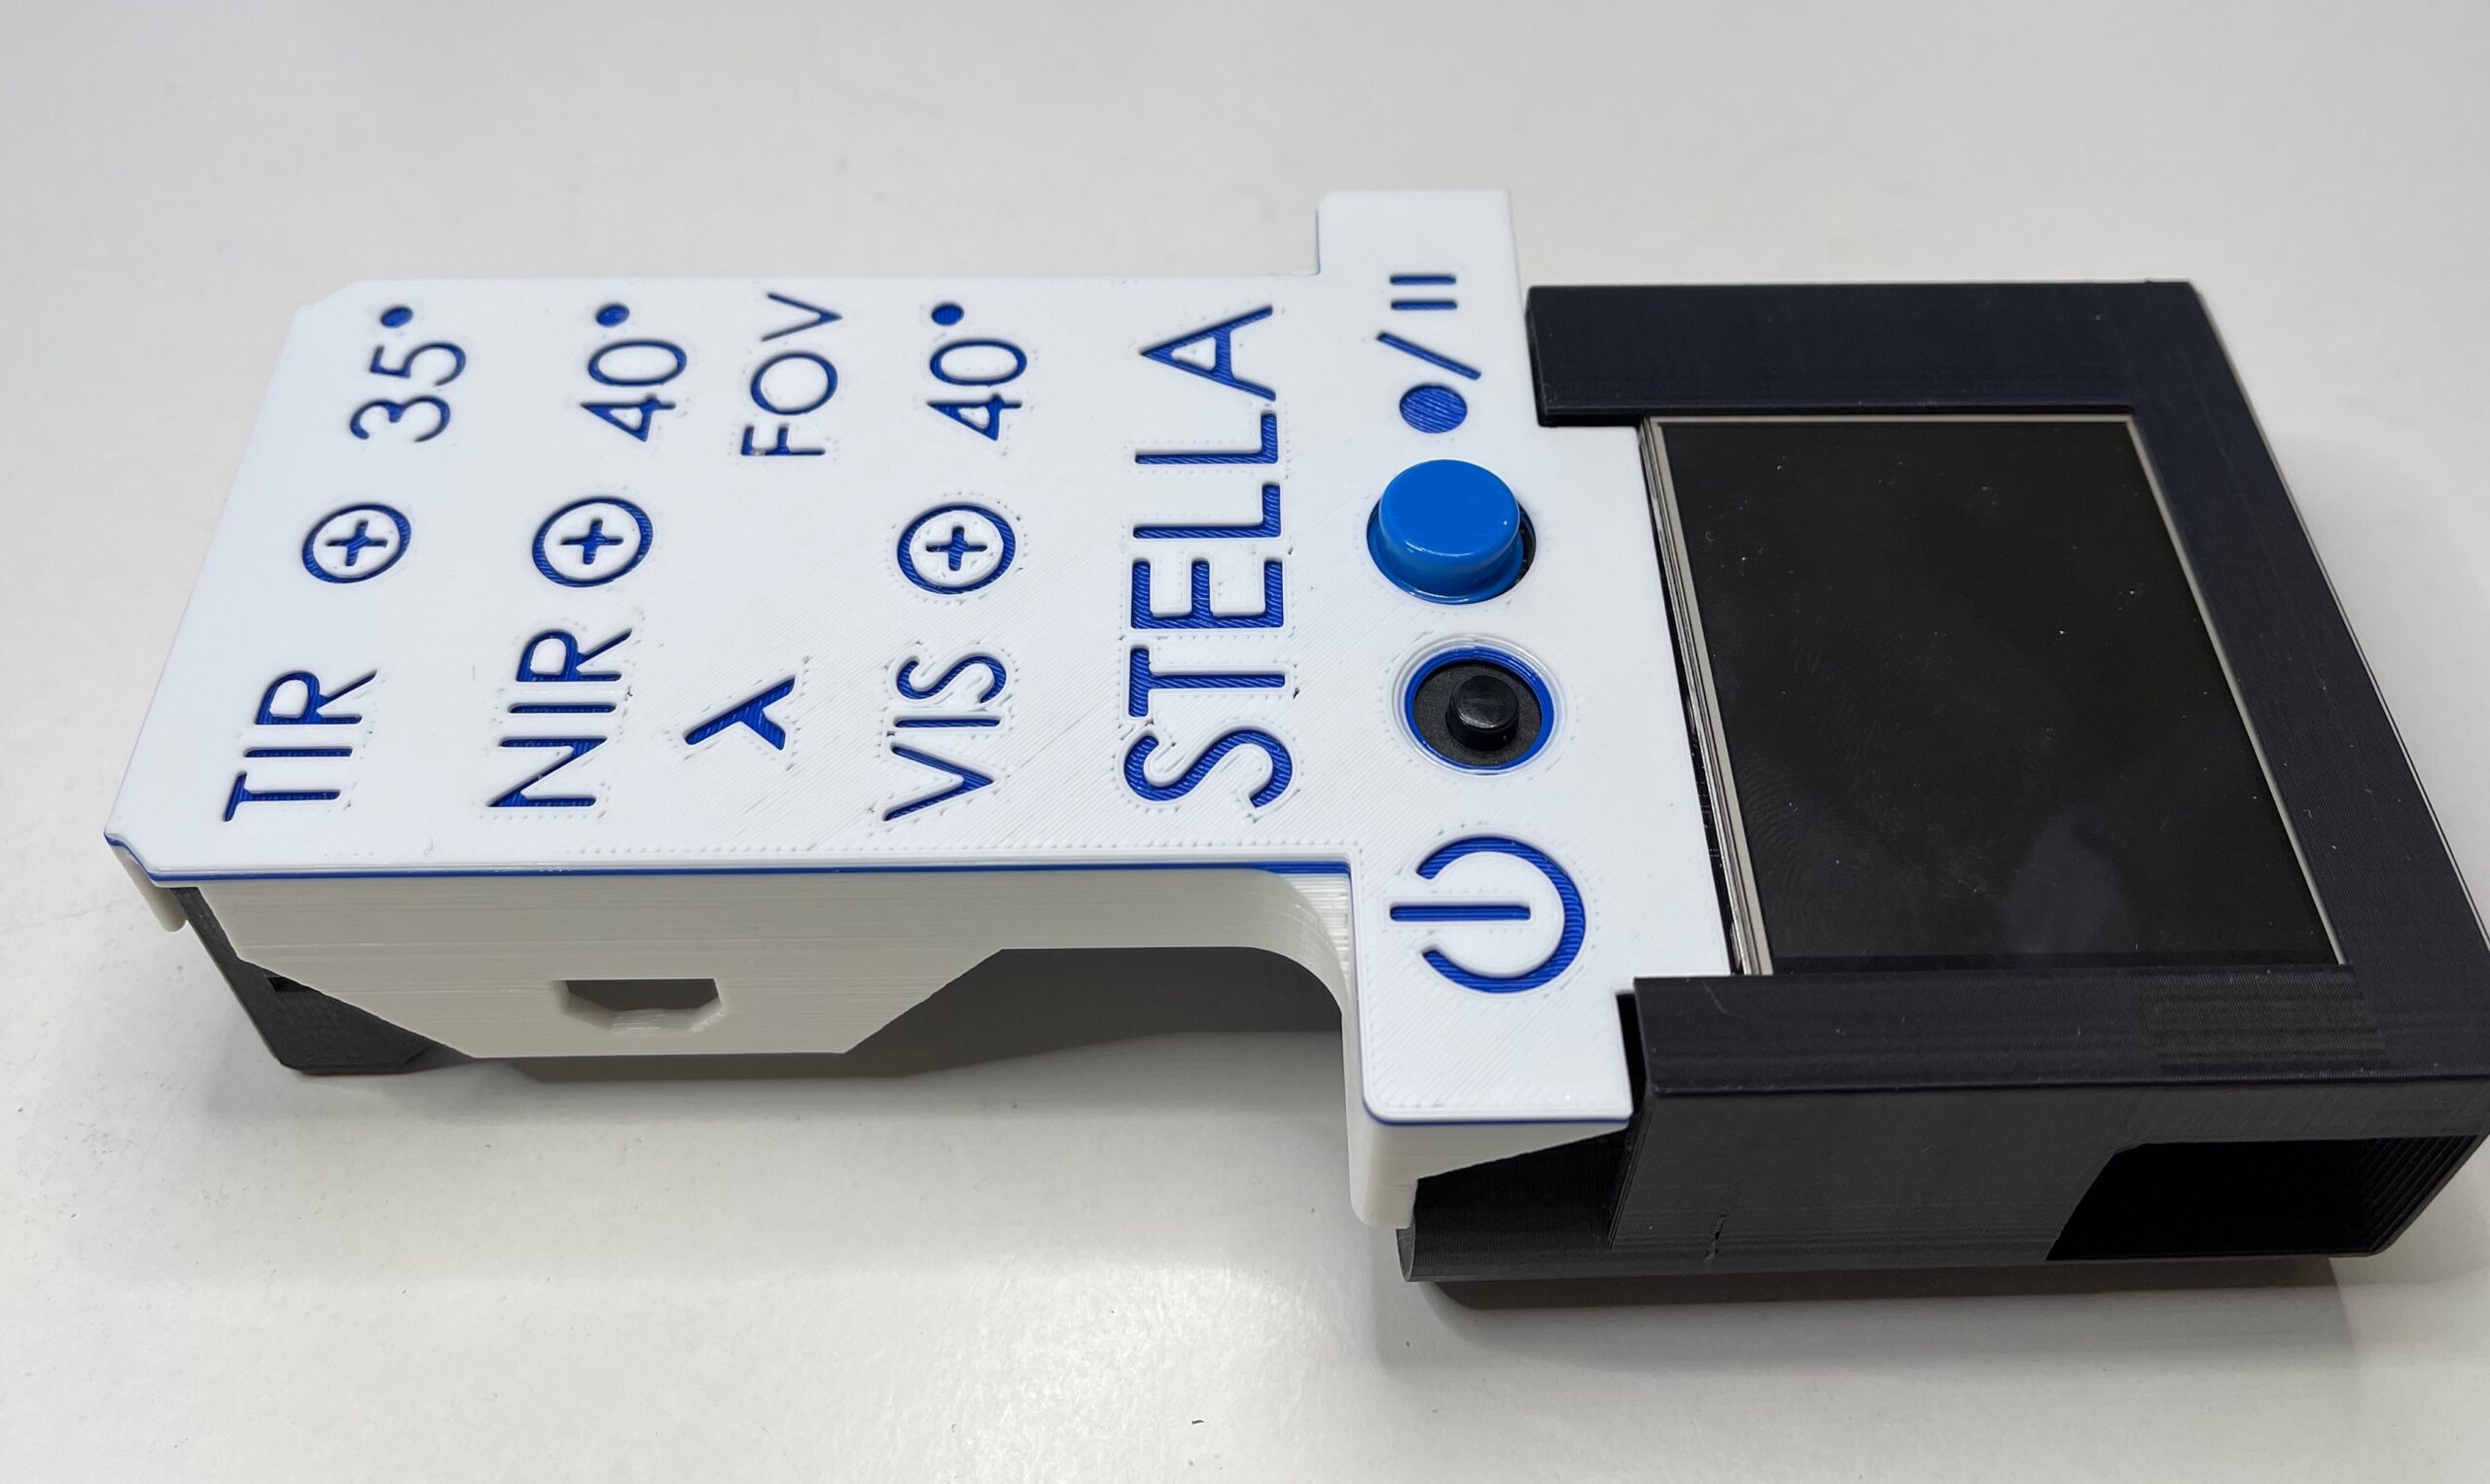
Step 4: Upper Housing Assembly
☐ Install the housing cover from the top, aligning the cover over the pushbuttons. Snap the housing cover onto the housing. (Do not slide it on from the end. It's designed to align with the buttons, to install from the top. You may need to apply some light spreading force on housing cover tabs to get it to snap onto the housing.)
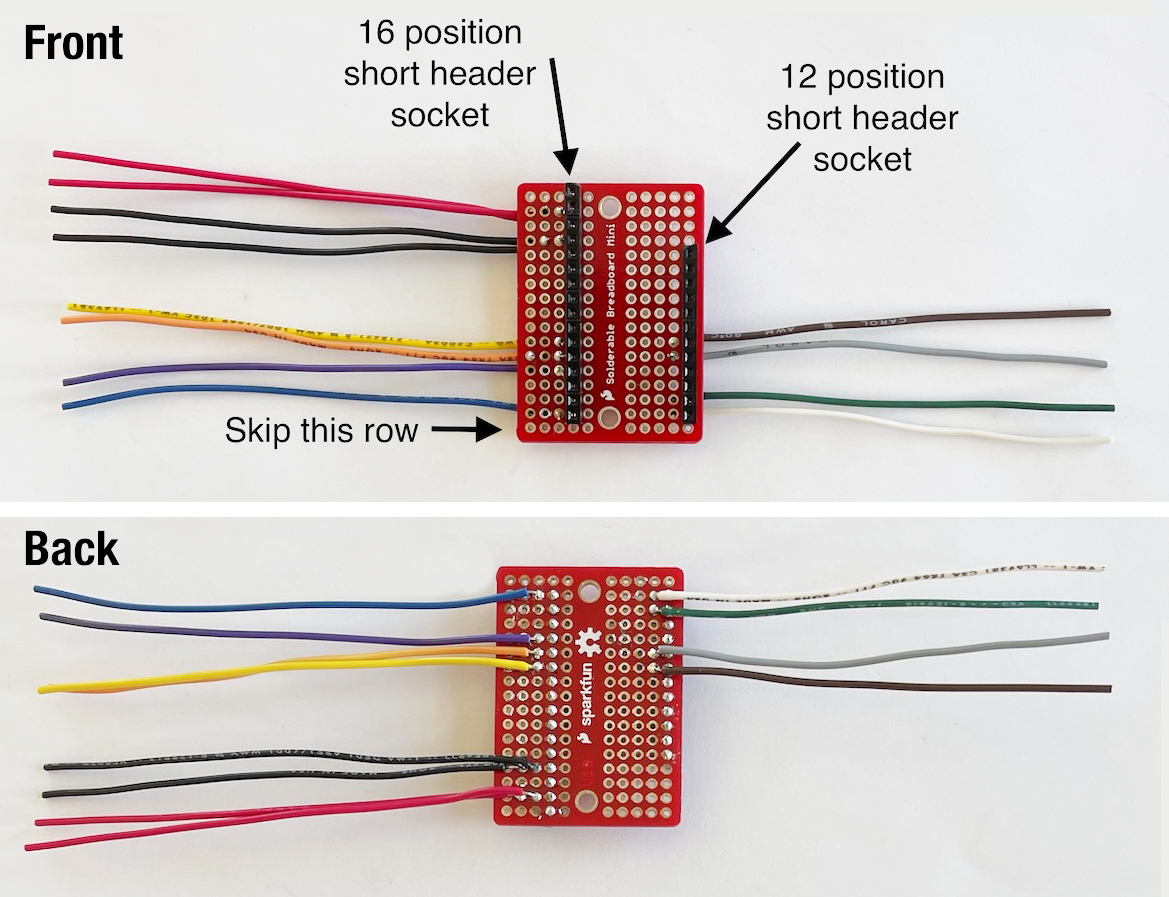
Step 1: Solder the socket headers
Solder the socket headers onto the circuit board as shown in the photos, duplicating the positions exactly, so the completed assembly will fit in the STELLA-1 housing.
Front:
☐ 16-pin header on fourth column starting from the top row
☐ 12-pin header on last column starting on the fifth row from the top
Note: the last row should be empty
Flip the board over on its back so blank row is on top.
Connect the wires. We recommend that the wires be trimmed to 7 cm = 3” long, which leaves enough length for bending them the assembly to fit.
Back:
Blue Wire:
☐ third column, row two
White Wire:
☐ ninth column, row two
Green Wire:
☐ ninth column, row three
Purple Wire:
☐ third column, row five
Orange Wire:
☐ third column, row six
Grey Wire:
☐ ninth column, row six
Yellow Wire:
☐ third column, row seven
Brown Wire:
☐ ninth column, row seven
Black Wires:
☐ second column, row
fourteen
☐ third column, row fourteen
Red Wires:
☐ second column, row
sixteen
☐ third column, row
sixteen
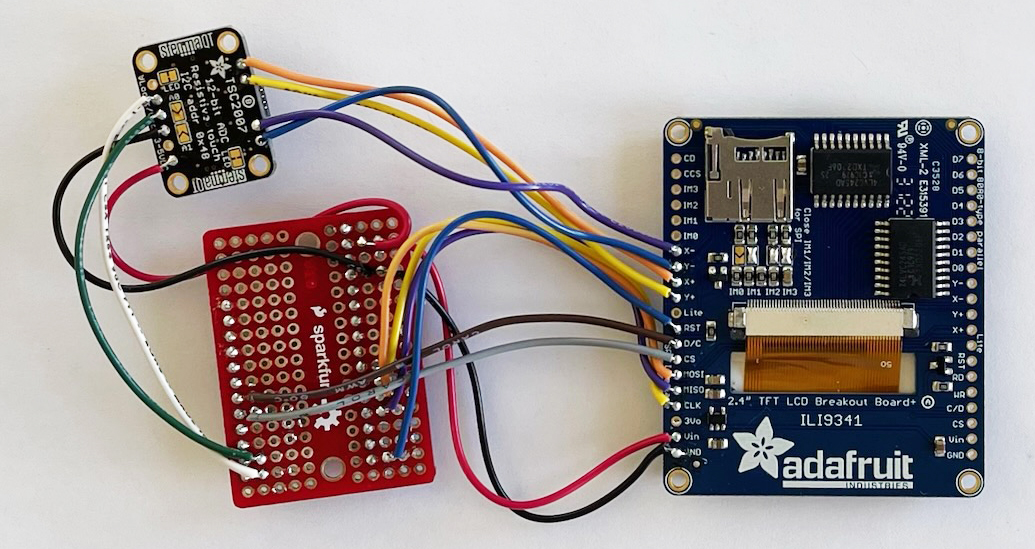
Step 2: Complete Wiring Harness
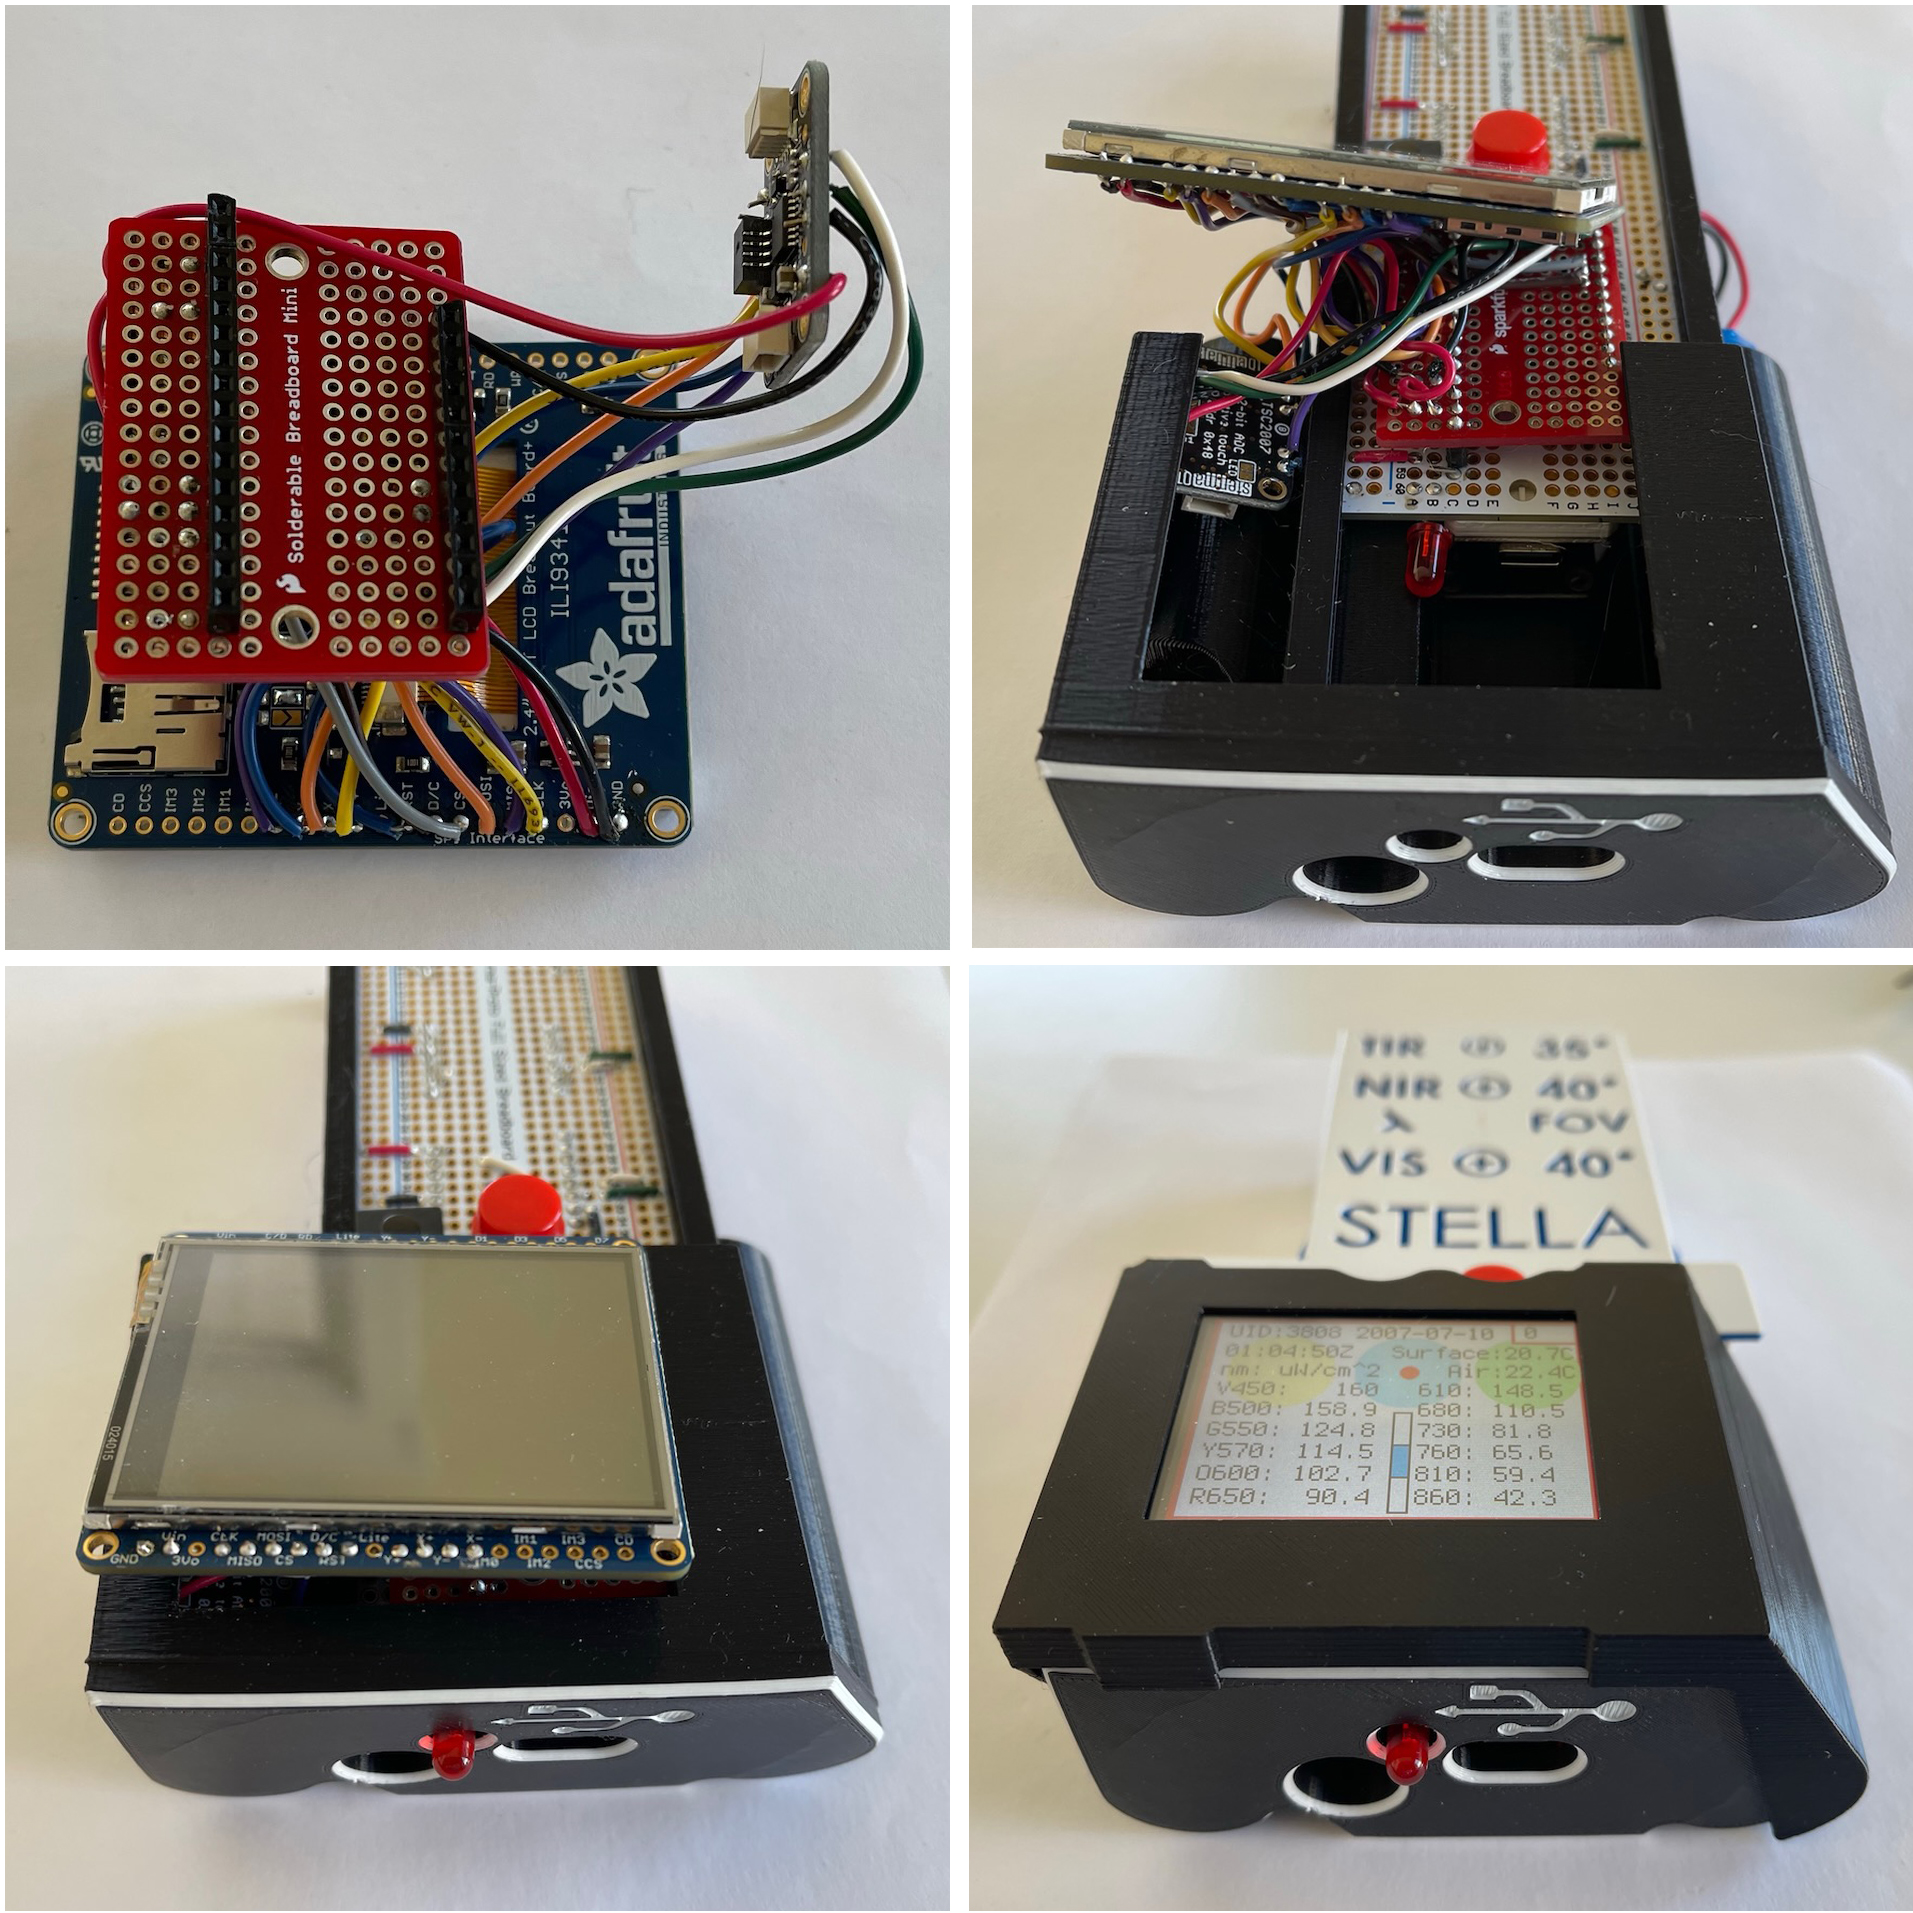
Connect the wires. Use the wires on the back of the breadboard to attach to the back of the touch controller and the back of the display as shown in the picture.
From Breadboard to Touch Controller: (4 wires)
Red Wire:
☐ red wire number 1 breadboard to touch controller VIN
Black Wire:
☐ black wire 1 breadboard to touch controller GND
White Wire:
☐ white wire 1 breadboard to touch controller SDA
Green Wire:
☐ green wire 1 breadboard to touch controller SCL
From Breadboard to Display: (8 wires)
Red Wire:
☐ red wire number 2 breadboard to display VIN
Black Wire:
☐ black wire number 2 breadboard to display GND
Yellow Wire:
☐ yellow wire number 1 breadboard to display CLK
Orange Wire:
☐ orange wire number 1 breadboard to display MOSI
Purple Wire:
☐ purple wire number 1 breadboard to display MISO
Blue Wire:
☐ blue wire number 1 breadboard to display RST
Grey Wire:
☐ grey wire number 1 breadboard to display CS
Brown Wire:
☐ brown wire number 1 breadboard to display D/C
From Touch Controller to Display: (4 wires)
Orange Wire:
☐ touch X+ to display X+
Yellow Wire:
☐ touch Y+ to display Y+
Purple Wire:
☐ touch X- to display X-
Blue Wire:
☐ touch Y- to display Y-
Step 3: Assembly
Carefully fold the assembly so that the mini circuit board can align with the Feather pins on the STELLA main circuit board. Position the touch screen controller board, tilted, so that it slides into the channel on the left side of the STELLA housing. Carefully manipulate the display so that it rests in the opening in the housing, and then attach the retainer to hold the display in place. The STELLA-1 software will detect the screen and touch controller, so the instrument controls will work the same whether you install the original Featherwing style display, or this alternative display to work around the supply chain shortages.
