
Locate the CircuitPython file in the STELLA-1.1/CircuitPython_uf2, named “adafruit-circuitpythonadafruit_feather_rp2040-en_US-8.0.5.uf2”. The file is specific to this particular microcontroller. The original source of the file is: https://circuitpython.org/board/ adafruit_feather_rp2040/ 
Connect the STELLA to your computer with a USB-C cable.
Press and hold the BOOTSEL button on the end of the microcontroller (yellow arrow). While holding this button, turn on the STELLA with the power button (blue arrow).
The STELLA should show up in your computer’s drive listing as RP1-RP2.
Drag and drop the UF2 file onto the RP1-RP2 drive. The drive will disappear (and the file system will complain about not ejecting the drive properly, that’s normal). The drive will reappear as CIRCUITPY. CircuitPython is now active on the STELLA.

In the STELLA-1.1 files, there is a folder named “code_and_libraries”. Open that folder. Drag and drop the folder labeled “lib” onto the CIRCUITPY drive. The computer will ask if you want to replace the existing file.Yes, we want to replace the existing file.
The lib folder contains the files shown here:
The main STELLA code, and the test codes, use these libraries. The codes will not run without the library files.
 To work with the STELLA codes, we need a code editor and serial connection.
Go to https://codewith.mu/ to download the Mu editor, and follow the instructions there for your particular computer.
Click on the Serial button to open the serial dialogue panel, known as the CircuitPython REPL, which stands for Read-Eval-Print Loop.
Click in the REPL panel, and then press ctrl-c to stop the code that is currently running on the STELLA. ( c is for “cancel” )
Press a key to enter the REPL, and you should get a message like this: “Adafruit CircuitPython 8.0.5 on 2023-03-31; Adafruit Feather RP2040 with rp2040”
Press ctrl-d to restart the code. ( d is for “decancel”, but it’s mostly because d is near c )
Boot note: STELLA won’t boot when it is already connected to USB.
To restart/ reboot/ start up, disconnect STELLA from the computer, then power it up (or cycle power off and then on again), and only then reconnect the STELLA to the computer. This limitation seems to be specific to the Feather RP2040.


In the “test_codes” folder, there are subfolders that contain codes for testing the devices and systems of the STELLA unit.
Open a subfolder, and copy the “code.py” file within.
Paste it onto the CIRCUITPY drive to run the test code. 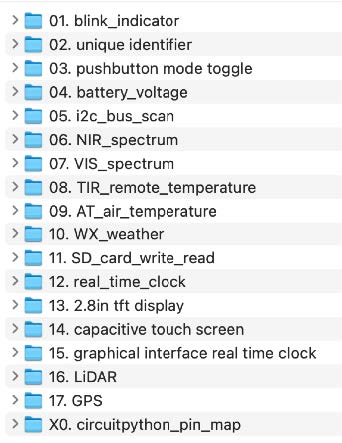
The output of the print statements in the code show up in the serial dialogue/ REPL panel.
Press the Load button to display the code in the main Mu editor window.
Make any changes you like to the code, and click Save to save and run the code.
Note that Save is destructive. It will overwrite whatever code is on the STELLA with the code that is currently in the main window.
Run each of the test codes to check that each of the subsystems is functioning properly. If it is not running properly, investigate/ diagnose/ debug, following the debugging instructions.
