Search
Close this search box.

STELLA-Q2 – Programming Instructions

Step 1: Load CircuitPython onto the Microcontroller.

  1. Locate the CircuitPython file in the STELLA-Q2/CircuitPython_uf2, named “adafruit-circuitpythonadafruit_feather_rp2040-en_US-8.0.5.uf2”. The file is specific to this particular microcontroller. The original source of the file is: https://circuitpython.org/board/sparkfun_thing_plus_rp2040/
  2. SparkFun Thing Plus 2040Connect the STELLA to your computer with a USB-C cable.
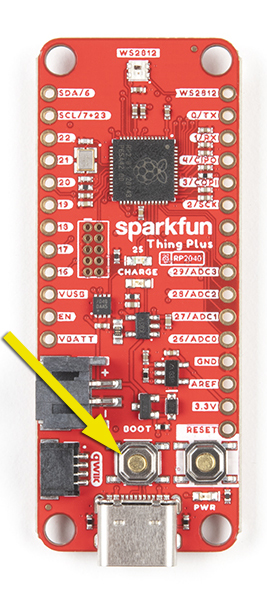
  3. The STELLA should show up in your computer’s drive listing as RP1-RP2. If not disconnect from USB-C then hold Boot button (yellow arrow) and plug back. *may have to hold boot and click reset button
  4. Drag and drop the UF2 file onto the RP1-RP2 drive. The drive will disappear (and the file system will complain about not ejecting the drive properly, that’s normal). The drive will reappear as CIRCUITPY. CircuitPython is now active on the STELLA.

Step 2: Setting the Time

1. Open Mu Editor.

2. Turn on the STELLA, and plug it in to your computer.

3. Click on the Serial button at the top of the Mu window.

4. In the Serial Dialogue panel that opens at the bottom of the Mu window, you should see a line of text that loads every second:
“Memory B: Used xxxxxx /Free xxxxxx recording…”
That tells you that Mu is communicating properly with the STELLA.

5. Open the Finder (on a Mac) (File Explorer in Windows). Find the CIRCUITPY drive in the file list. Click on it to load it into the window. You should see three items: boot_out.txt, code.py, and a folder called lib. Copy the lib file to CIRCUITPY drive . 

6. In another Finder/Explorer window your computer, in the code files that you downloaded for programming the STELLA, open the folder called test_codes. In there you should find a folder called real_time_clock, and in that folder you should find a file named code.py

7. Copy that code.py file, and paste it onto the CIRCUITPY drive. (Drag and drop should also work)

The system will ask you if you want to replace the existing code.py file, and you should choose to Replace.

8. Now go back to the Mu window. In the Serial panel it should be printing out the date and time, once a second. That shows that you have the real time clock test code running on the STELLA. The STELLA screen itself should be either blank, or showing the same printout as you are seeing in the Serial dialogue.

9. Now click on the Load button at the top of the Mu editor. You should see the contents of the CIRCUITPY drive. If you see some other contents, change the choices so that you are looking at the CIRCUITPY drive. (If you save a file somewhere else on the computer, it will not run on the STELLA, but Mu doesn’t warn you about that, or offer a Save As button to correct that)

10. In the Load window, select the code.py file on the CIRCUITPY drive, and the real time clock test code should load in the Mu window.

11. There is a line of code that reads “if False”. Change that line to “if True”. It’s important to get the capitalization correct (lower case if, upper case T in True).

12. Open a web browser window, and navigate to time.is/UTC to get a readout of the current global universal time.

13. A few lines below the “if True” line is a line “t = time.struct_time((…))” That line is a bit out of date by now. Change the line as follows: I’m setting my STELLA as I am writing this, so the line now should read:

t = time.struct_time(( 2022, 09, 30, 19, 38, 00, 5, -1, -1))

I’ve set the seconds to 00. 5 designates the day as Friday, and the -1, -1 tells the clock not to set the day of the year or ‘is daylight savings’ fields.

14. Wait for the web UTC clock to get within two seconds of the time you’ve put in the time.struct line, and then click the Save button at the top of the Mu editor. That sets the real time clock module on the STELLA. The printout in the Serial panel should show the correct time now.

15. To make sure we don’t save again and reset the time incorrectly, change the “if True” line to “if False”. Then save the code again. The Serial printout should continue to show the correct time.

16. Now go back to the Finder/ Explorer, and locate the STELLA-Q2_code_and_libraries folder. . Copy the code.py from there to the CIRCUITPY drive, choose to Replace the existing file, and the STELLA should run the full instrumentation, now with the correct time.

Step 3: Programming STELLA-Q2

Now that you have CircuitPython installed on the microcontroller, you are ready to program your STELLA-Q2.

1. Download the .ZIP file that contains the latest software.

2. In the folder labelled “code and libraries”, copy the folder named “lib”, and paste it onto the CIRCUITPY drive. (You can also drag and drop it to the CIRCUITPY drive.) You may get a message that the folder already exists; choose to replace the existing folder.

3. From the same “SQ2 code and libraries” folder, select the file named “code.py” and copy/paste or drag/drop it onto the CIRCUITPY drive. The code should start up (it takes 12 seconds to boot) and you will have a working STELLA spectrometer. We’ve written the code so that it is tolerant of missing devices, so even if you haven’t got all the parts it should still work.

4. In the “test codes” folder, there is a subfolder called “real time clock”. Inside that folder is a file named “code.py” Copy and paste that file to the CIRCUITPY drive to set the real time clock. Follow the detailed instructions here to set the clock.

5. Once the clock is set, repeat Step 3 to install the STELLA instrument software.

* Any use of trade, firm, or product names is for descriptive purposes only and does not imply endorsement by the U.S. Government.